一、环境搭建
$ npm install dva-cli -g

# 创建应用
$ dva new dva-quickstart

# 启动
$ npm start
|
react项目的推荐目录结构(如果使用dva脚手架创建,则自动生成如下)
|── /mock/             # 数据mock的接口文件
|── /src/              # 项目源码目录(我们开发的主要工作区域)
|   |── /components/   # 项目组件(用于路由组件内引用的可复用组件)
|   |── /routes/       # 路由组件(页面维度)
|   |  |── route1.js
|   |  |── route2.js   # 根据router.js中的映射,在不同的url下,挂载不同的路由组件
|   |  └── route3.js
|   |── /models/       # 数据模型(可以理解为store,用于存储数据与方法)
|   |  |── model1.js
|   |  |── model2.js   # 选择分离为多个model模型,是根据业务实体进行划分
|   |  └── model3.js
|   |── /services/     # 数据接口(处理前台页面的ajax请求,转发到后台)
|   |── /utils/        # 工具函数(工具库,存储通用函数与配置参数)
|   |── router.js       # 路由配置(定义路由与对应的路由组件)
|   |── index.js       # 入口文件
|   |── index.less
|   └── index.html
|── package.json       # 项目信息
└── proxy.config.js    # 数据mock配置
|
使用 antd
npm i babel-plugin-import --save
|
babel-plugin-import 是用来按需加载 antd 的脚本和样式的
- 编辑
.webpackrc,使 babel-plugin-import 插件生效
{
+  "extraBabelPlugins": [
+    ["import", { "libraryName": "antd", "libraryDirectory": "es", "style": "css" }]
+  ]
}
|
二、初识Dva
2.1 Dva的特性
dva = React-Router + Redux + Redux-saga
|
- 仅有 5 个
API,仅有5个主要的api
- 支持
HMR,支持模块的热更新
- 支持
SSR (ServerSideRender),支持服务器端渲染
- 支持
Mobile/ReactNative,支持移动手机端的代码编写
- 支持
TypeScript
- 支持路由和
Model 的动态加载
2.2 Dva的五个API
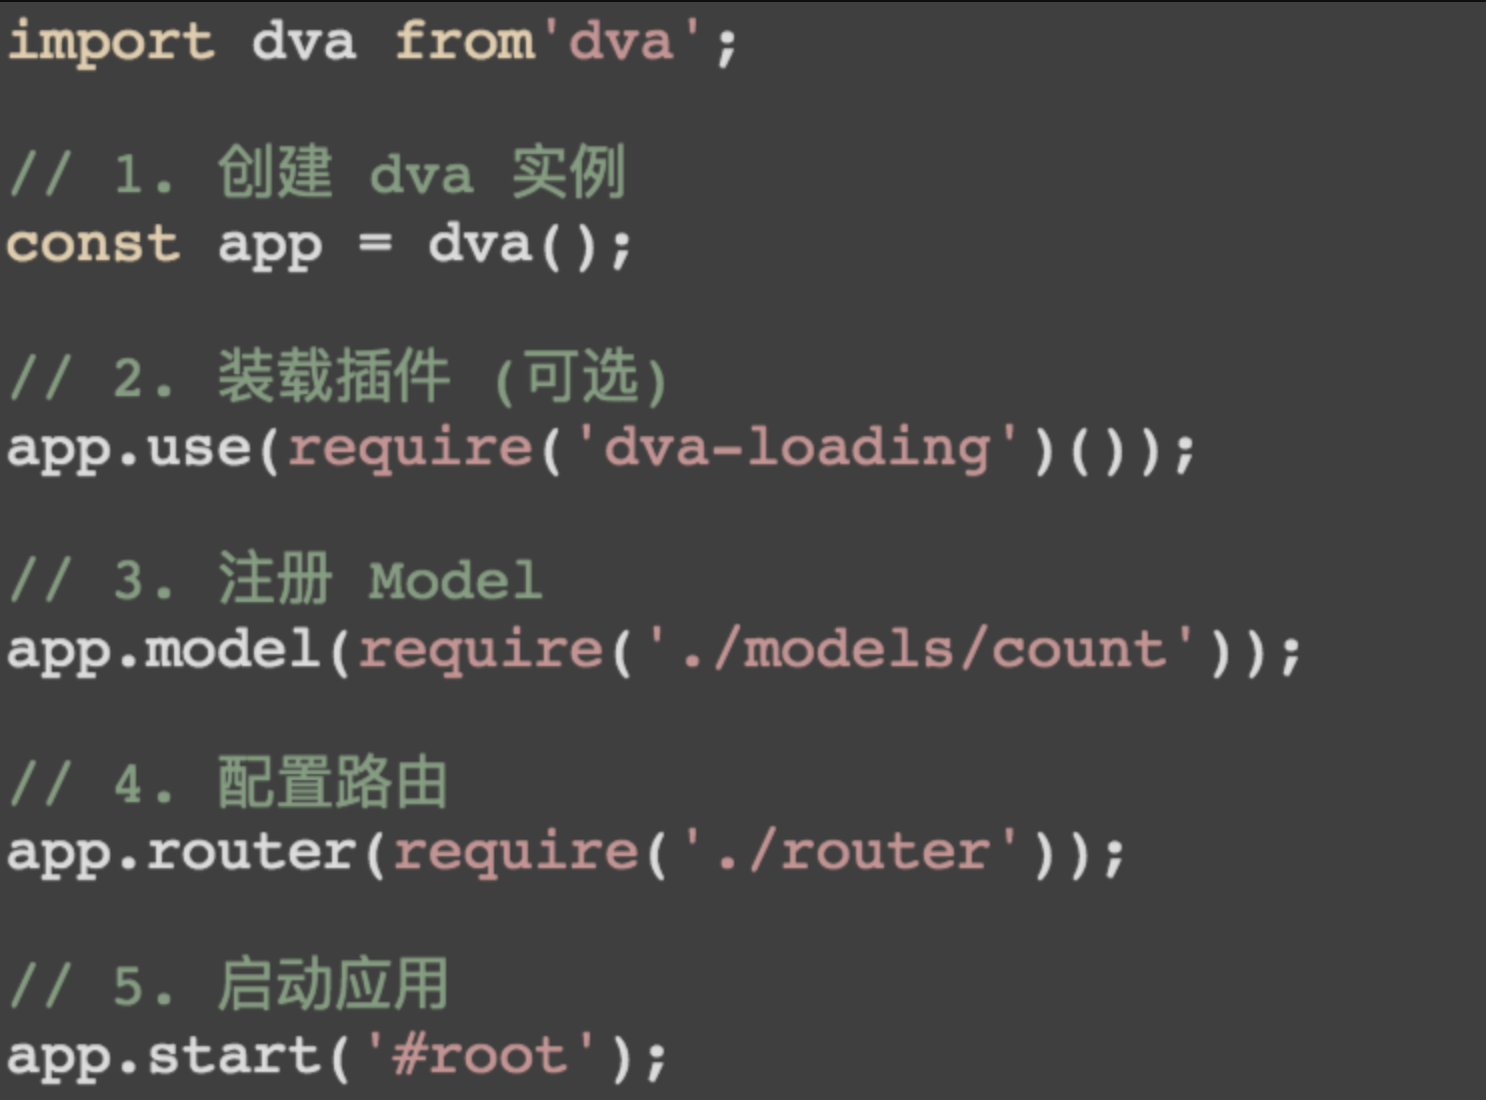
2.2.1 app = dva(Opts)
app = dva(Opts):创建应用,返回 dva 实例。(注:dva 支持多实例)**
在opts可以配置所有的hooks
const app = dva({
     history,
     initialState,
     onError,
     onAction,
     onStateChange,
     onReducer,
     onEffect,
     onHmr,
     extraReducers,
     extraEnhancers,
});
|
hooks包含如下配置项
1、 onError((err, dispatch) => {})
effect 执行错误或 subscription 通过 done 主动抛错时触发,可用于管理全局出错状态- 注意:
subscription 并没有加 try...catch,所以有错误时需通过第二个参数 done 主动抛错
app.model({
  subscriptions: {
    setup({ dispatch }, done) {
      done(e)
    },
  },
})
|
2、 onAction(fn | fn[])
在action被dispatch时触发,用于注册 redux 中间件。支持函数或函数数组格式
- 例如我们要通过
redux-logger 打印日志
import createLogger from 'redux-logger';
const app = dva({
  onAction: createLogger(opts),
})
|
3、 onStateChange(fn)
state 改变时触发,可用于同步 state 到 localStorage,服务器端等
4、 onReducer(fn)
封装 reducer 执行,比如借助 redux-undo 实现 redo/undo
import undoable from 'redux-undo';
const app = dva({
onReducer: reducer => {
return (state, action) => {
const undoOpts = {};
const newState = undoable(reducer, undoOpts)(state, action);
return { ...newState, routing: newState.present.routing };
},
},
})
|
5、 onEffect(fn)
封装 effect 执行。比如 dva-loading 基于此实现了自动处理 loading 状态
6、 onHmr(fn)
热替换相关,目前用于 babel-plugin-dva-hmr
7、 extraReducers
指定额外的 reducer,比如 redux-form 需要指定额外的 form reducer
import { reducer as formReducer } from 'redux-form'
const app = dva({
  extraReducers: {
    form: formReducer,
  },
})
|
这里比较常用的是,history的配置,一般默认的是hashHistory,如果要配置 history 为 browserHistory,可以这样
import createHistory from 'history/createBrowserHistory';
const app = dva({
  history: createHistory(),
});
|
initialState:指定初始数据,优先级高于 model 中的 state,默认是 {},但是基本上都在modal里面设置相应的state
2.2.2 app.use(Hooks)
app.use(Hooks):配置 hooks 或者注册插件
这里最常见的就是dva-loading插件的配置
import createLoading from 'dva-loading';
...
app.use(createLoading(opts));
|
但是一般对于全局的loading我们会根据业务的不同来显示相应不同的loading图标,我们可以根据自己的需要来选择注册相应的插件
2.2.3 app.model(ModelObject)
app.model(ModelObject):这个是你数据逻辑处理,数据流动的地方
2.2.4 app.unmodel(namespace)
取消 model 注册,清理 reducers, effects 和 subscriptions。subscription 如果没有返回 unlisten 函数,使用 app.unmodel 会给予警告
2.2.5 app.router(Function)
注册路由表,这一操作步骤在dva中也很重要
app.router(require('./router'))
import { Router, Route } from 'dva/router';
import IndexPage from './routes/IndexPage'
import TodoList from './routes/TodoList'
function RouterConfig({ history }) {
return (
<Router history={history}>
<Route path="/" component={IndexPage} />
<Route path='/todoList' components={TodoList}/>
</Router>
)
}
export default RouterConfig
|
如果我们想解决组件动态加载问题,我们的路由文件也可以按照下面的写法来写
import { Router, Switch, Route } from 'dva/router'
import dynamic from 'dva/dynamic'

function RouterConfig({ history, app }) {
  const IndexPage = dynamic({
    app,
    component: () => import('./routes/IndexPage'),
  })

  const Users = dynamic({
    app,
    models: () => [import('./models/users')],
    component: () => import('./routes/Users'),
  })

  return (
    <Router history={history}>
      <Switch>
        <Route exact path="/" component={IndexPage} />
        <Route exact path="/users" component={Users} />
      </Switch>
    </Router>
  )
}

export default RouterConfig
|
其中dynamic(opts) 中opt包含三个配置项:
app: dva 实例,加载 models 时需要models: 返回 Promise 数组的函数,Promise 返回 dva model`component:返回 Promise 的函数,Promise 返回 React Component
2.2.6 app.start
启动应用,即将我们的应用跑起来
2.3 Dva九个概念
2.3.1 State
初始值,我们在 dva() 初始化的时候和在 modal 里面的 state 对其两处进行定义,其中 modal 中的优先级低于传给 dva() 的 opts.initialState
const app = dva({
initialState: { count: 1 },
});
app.model({
namespace: 'count',
state: 0,
});
|
2.3.2 Action
表示操作事件,可以是同步,也可以是异步
action 的格式如下,它需要有一个 type ,表示这个 action 要触发什么操作;payload 则表示这个 action 将要传递的数据
{
  type: String,
  payload: data,
}
|
我们通过 dispatch 方法来发送一个 action
dispatch({ type: 'todos/add', payload: 'Learn Dva' });
|
其实我们可以构建一个Action 创建函数,如下
function addTodo(text) {
return {
type: ADD_TODO,
text
}
}
dispatch(addTodo())
|
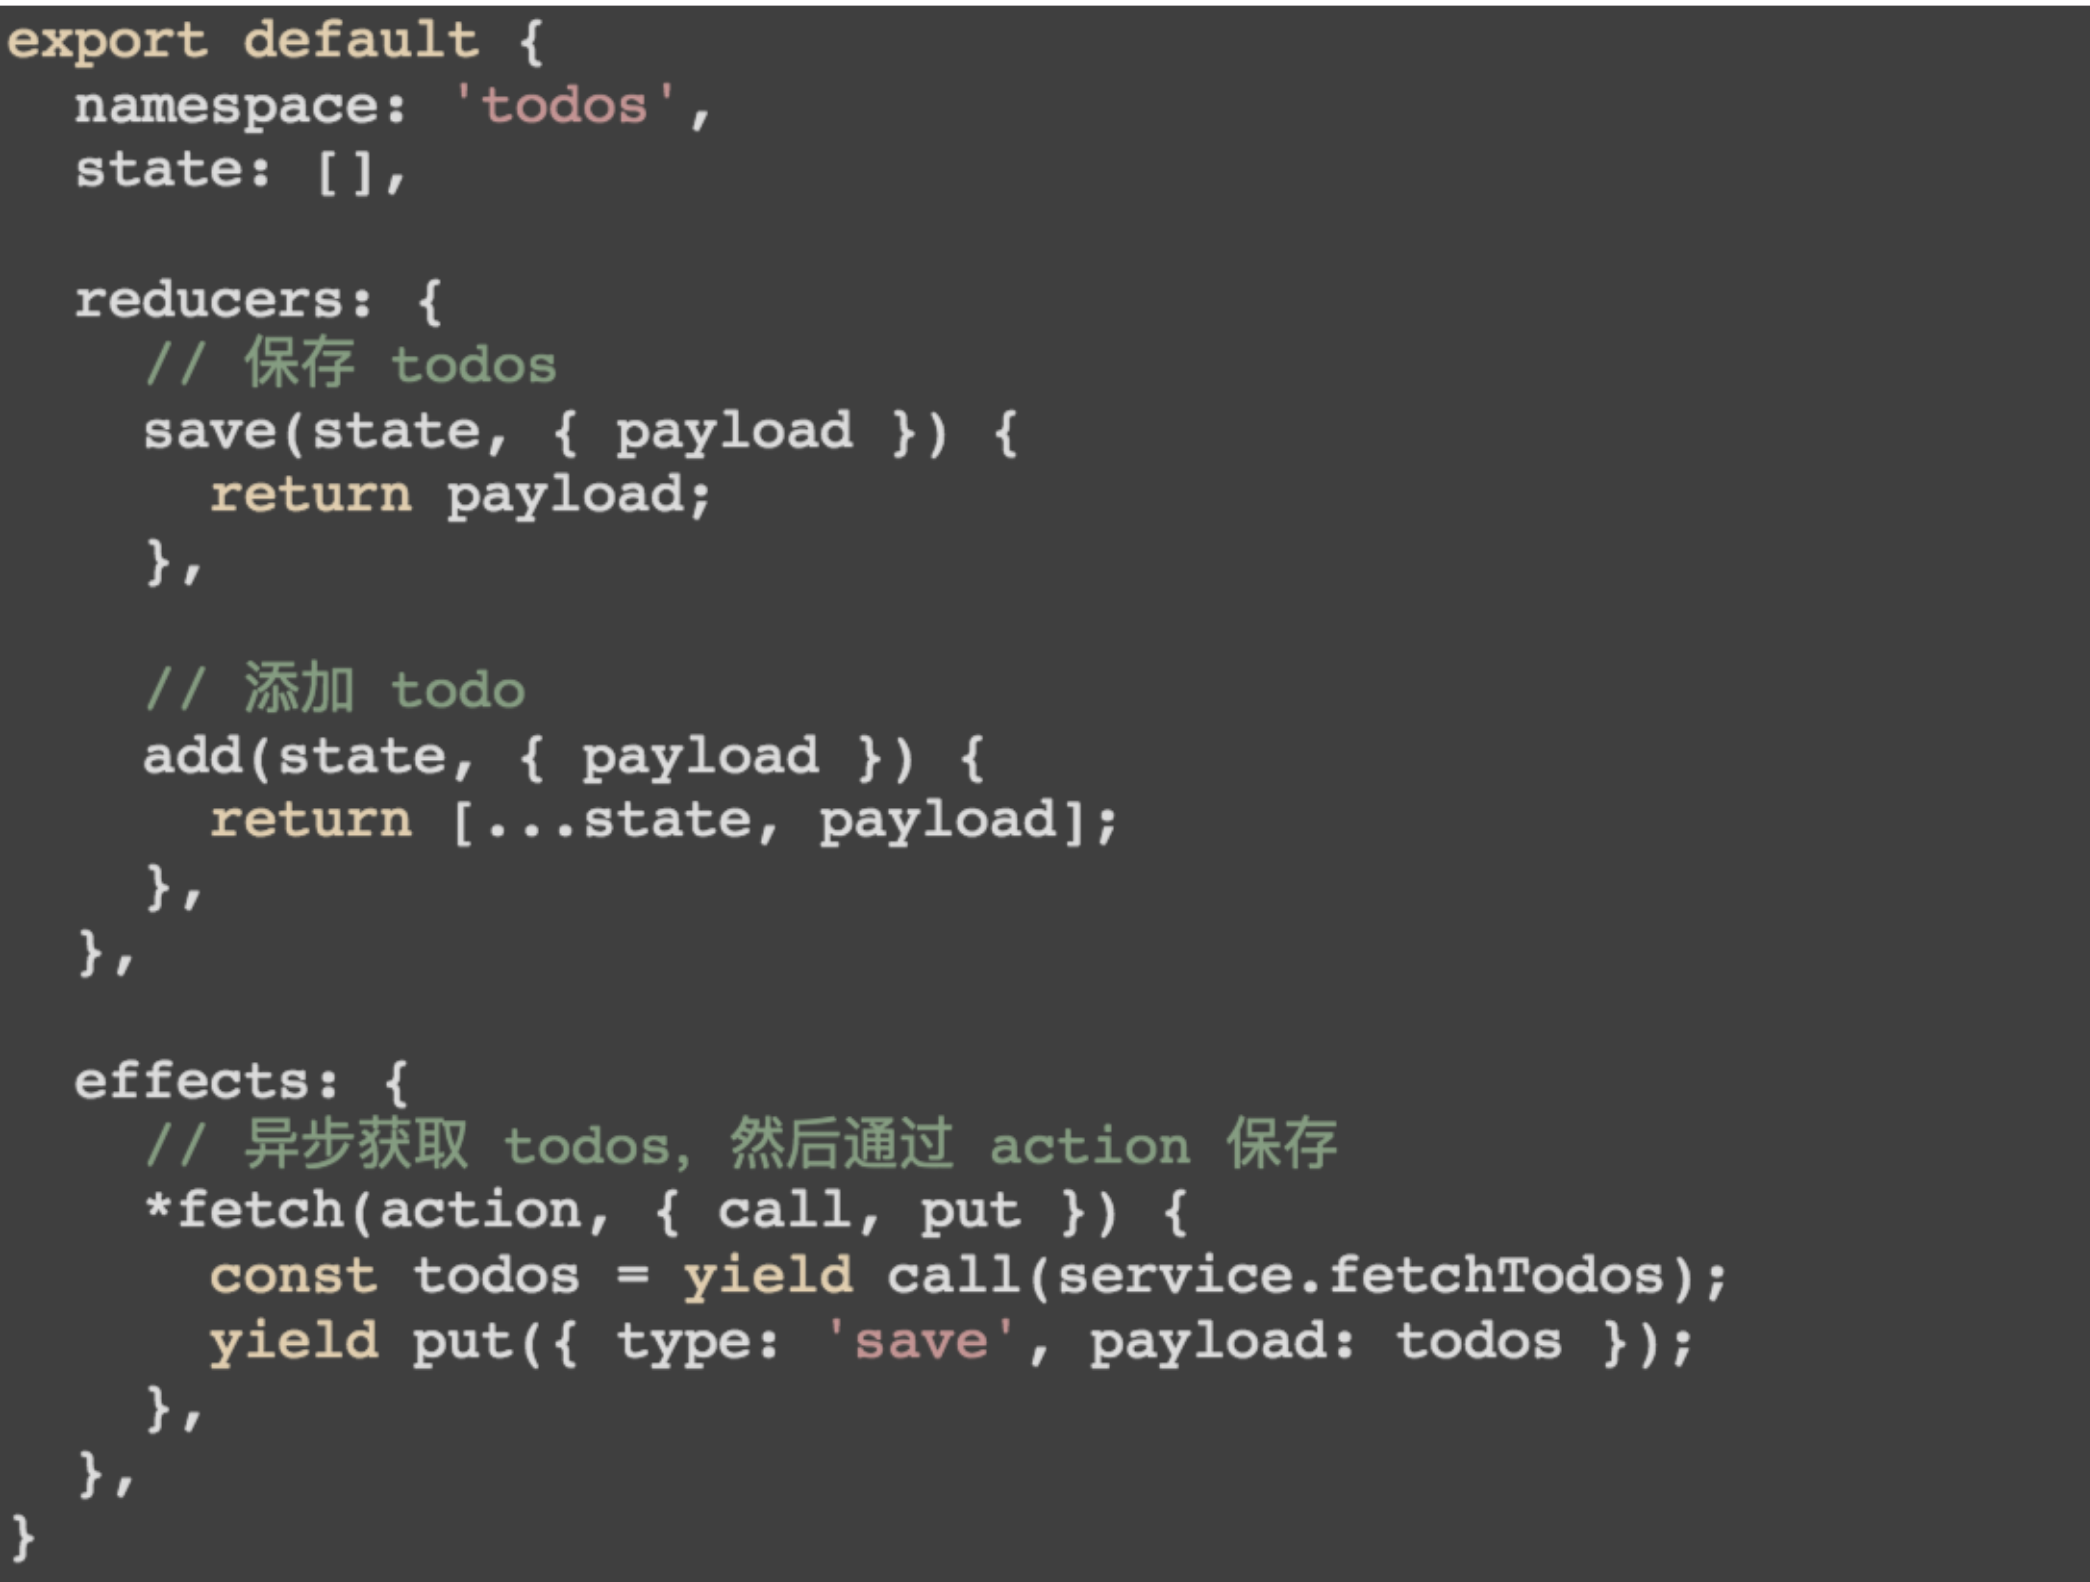
2.3.3 Model
model 是 dva 中最重要的概念,Model 非 MVC 中的 M,而是领域模型,用于把数据相关的逻辑聚合到一起,几乎所有的数据,逻辑都在这边进行处理分发
import queryString from 'query-string'
import * as todoService from '../services/todo'
export default {
namespace: 'todo',
state: {
list: []
},
reducers: {
save(state, { payload: { list } }) {
return { ...state, list }
}
},
effects: {
*addTodo({ payload: value }, { call, put, select }) {
const data = yield call(todoService.query, value)
console.log(data)
let tempList = yield select(state => state.todo.list)
let list = []
list = list.concat(tempList)
const tempObj = {}
tempObj.title = value
tempObj.id = list.length
tempObj.finished = false
list.push(tempObj)
yield put({ type: 'save', payload: { list }})
},
*toggle({ payload: index }, { call, put, select }) {
const data = yield call(todoService.query, index)
let tempList = yield select(state => state.todo.list)
let list = []
list = list.concat(tempList)
let obj = list[index]
obj.finished = !obj.finished
yield put({ type: 'save', payload: { list } })
},
*delete({ payload: index }, { call, put, select }) {
const data = yield call(todoService.query, index)
let tempList = yield select(state => state.todo.list)
let list = []
list = list.concat(tempList)
list.splice(index, 1)
yield put({ type: 'save', payload: { list } })
},
*modify({ payload: { value, index } }, { call, put, select }) {
const data = yield call(todoService.query, value)
let tempList = yield select(state => state.todo.list)
let list = []
list = list.concat(tempList)
let obj = list[index]
obj.title = value
yield put({ type: 'save', payload: { list } })
}
},
subscriptions: {
setup({ dispatch, history }) {
return history.listen(({ pathname, search }) => {
const query = queryString.parse(search)
let list = []
if (pathname === 'todoList') {
dispatch({ type: 'save', payload: {list} })
}
})
}
}
}
|
model对象中包含5个重要的属性
state
这里的 state 跟我们刚刚讲的 state 的概念是一样的,只不过她的优先级比初始化的低,但是基本上项目中的 state 都是在这里定义的
namespace
model 的命名空间,同时也是他在全局 state 上的属性,只能用字符串,我们发送在发送 action 到相应的 reducer 时,就会需要用到 namespace
Reducer
以key/value 格式定义 reducer,用于处理同步操作,唯一可以修改 state 的地方。由 action 触发。其实一个纯函数
namespace: 'todo',
state: {
list: []
},
reducers: {
save(state, { payload: { list } }) {
return { ...state, list }
}
}
|
Effect
用于处理异步操作和业务逻辑,不直接修改 state,简单的来说,就是获取从服务端获取数据,并且发起一个 action 交给 reducer 的地方
其中它用到了redux-saga,里面有几个常用的函数。
effects: {
*addTodo({ payload: value }, { call, put, select }) {
const data = yield call(todoService.query, value)
console.log(data)
let tempList = yield select(state => state.todo.list)
let list = []
list = list.concat(tempList)
const tempObj = {}
tempObj.title = value
tempObj.id = list.length
tempObj.finished = false
list.push(tempObj)
yield put({ type: 'save', payload: { list }})
},
*toggle({ payload: index }, { call, put, select }) {
const data = yield call(todoService.query, index)
let tempList = yield select(state => state.todo.list)
let list = []
list = list.concat(tempList)
let obj = list[index]
obj.finished = !obj.finished
yield put({ type: 'save', payload: { list } })
},
*delete({ payload: index }, { call, put, select }) {
const data = yield call(todoService.query, index)
let tempList = yield select(state => state.todo.list)
let list = []
list = list.concat(tempList)
list.splice(index, 1)
yield put({ type: 'save', payload: { list } })
},
*modify({ payload: { value, index } }, { call, put, select }) {
const data = yield call(todoService.query, value)
let tempList = yield select(state => state.todo.list)
let list = []
list = list.concat(tempList)
let obj = list[index]
obj.title = value
yield put({ type: 'save', payload: { list } })
}
}
|

在项目中最主要的会用到的是 put 与 call
Subscription
- 以
key/value 格式定义 subscription,subscription 是订阅,用于订阅一个数据源,然后根据需要 dispatch 相应的 action
subscription 是订阅,用于订阅一个数据源,然后根据需要 dispatch 相应的 action。在 app.start() 时被执行,数据源可以是当前的时间、当前页面的url、服务器的 websocket 连接、history 路由变化等等。
- 注意:如果要使用
app.unmodel(),subscription 必须返回 unlisten 方法,用于取消数据订阅
subscriptions: {
setup({ dispatch, history }) {
return history.listen(({ pathname, search }) => {
const query = queryString.parse(search)
let list = []
if (pathname === 'todoList') {
dispatch({ type: 'save', payload: {list} })
}
})
}
}
|
2.3.4 Router
Router 表示路由配置信息,项目中的 router.js
export default function({ history }){
  return(
    <Router history={history}>
      <Route path="/" component={App} />
    </Router>
  );
}
|
RouteComponent
RouteComponent 表示 Router 里匹配路径的 Component,通常会绑定model的数据。如下:
import { connect } from 'dva';

function App() {
  return <div>App</div>;
}

function mapStateToProps(state) {
  return { todos: state.todos };
}

export default connect(mapStateToProps)(App);
|
2.4 整体架构
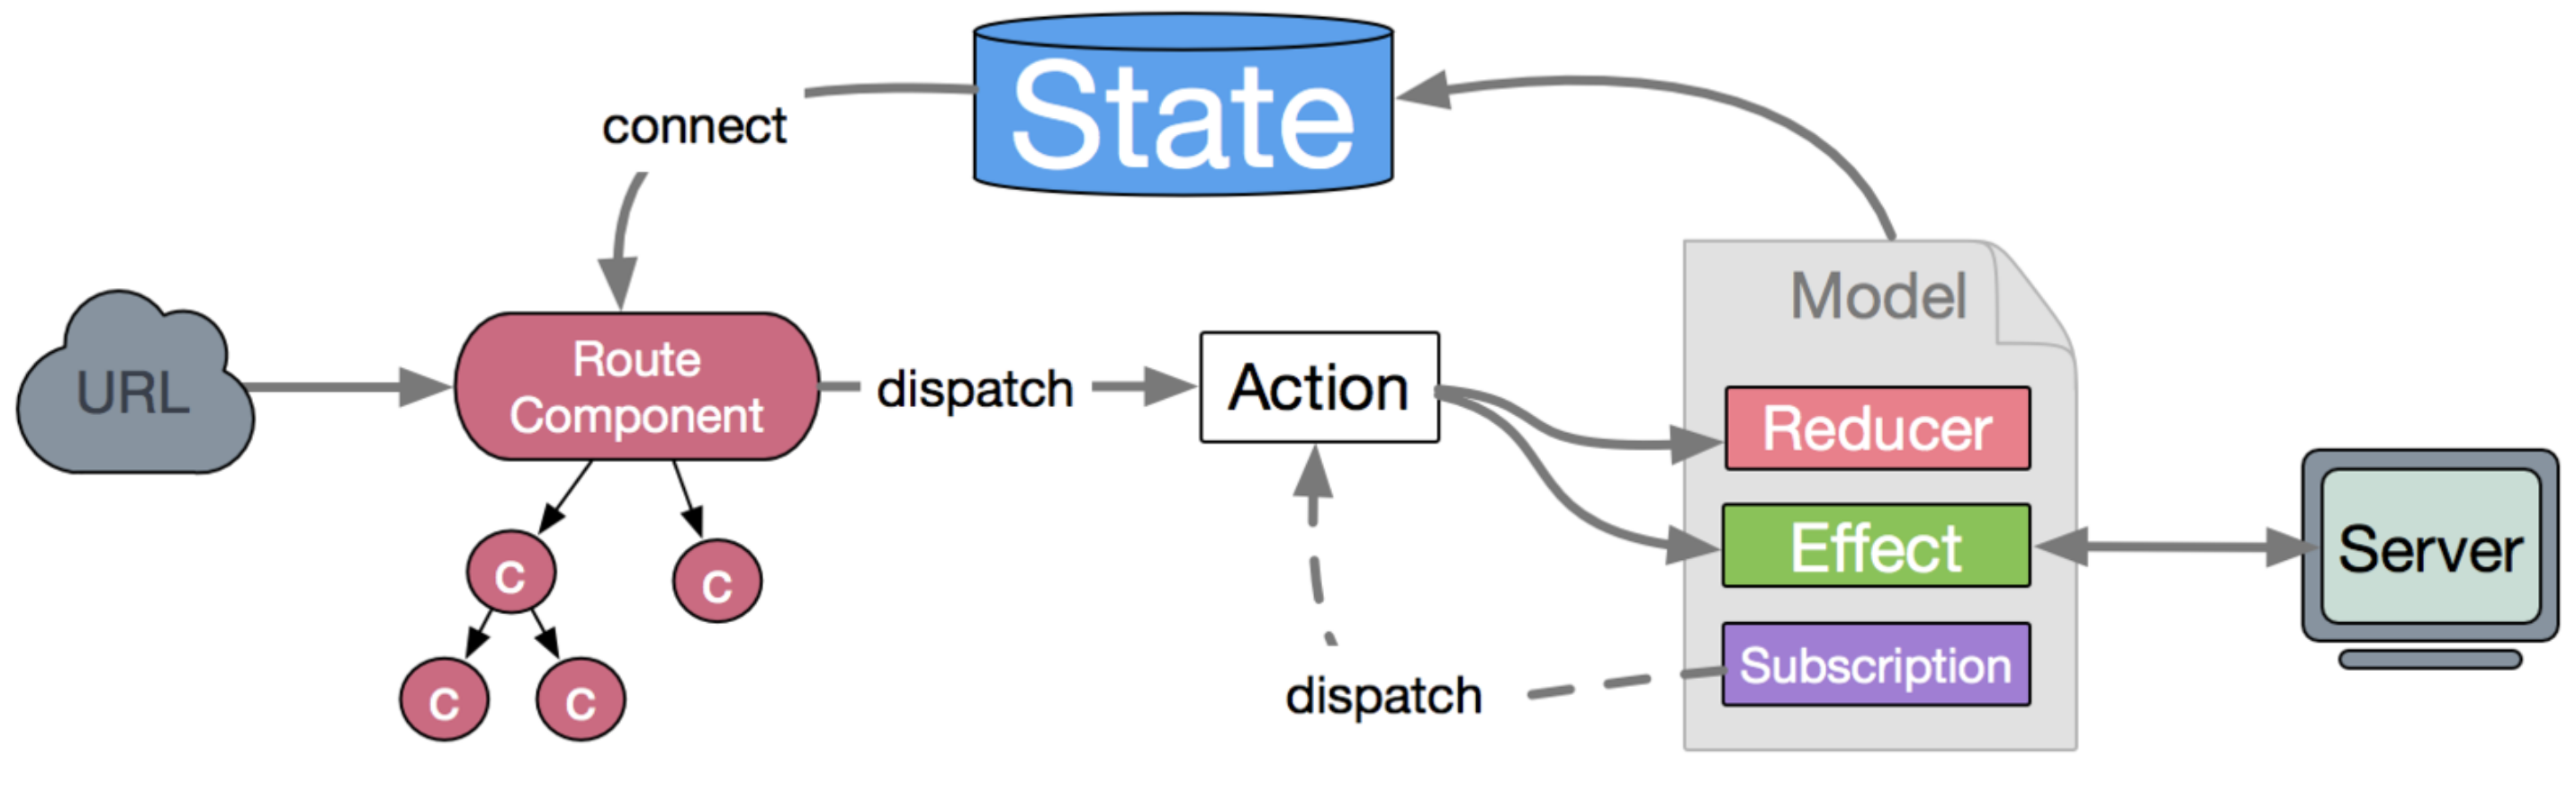
- 首先我们根据
url 访问相关的 Route-Component,在组件中我们通过 dispatch 发送 action 到 model 里面的 effect 或者直接 Reducer
- 当我们将
action发送给Effect,基本上是取服务器上面请求数据的,服务器返回数据之后,effect 会发送相应的 action 给 reducer,由唯一能改变 state 的 reducer 改变 state ,然后通过connect重新渲染组件。
- 当我们将
action发送给reducer,那直接由 reducer 改变 state,然后通过connect重新渲染组件
2.5 Dva图解
图解一:加入Saga
React 只负责页面渲染, 而不负责页面逻辑, 页面逻辑可以从中单独抽取出来, 变成 store
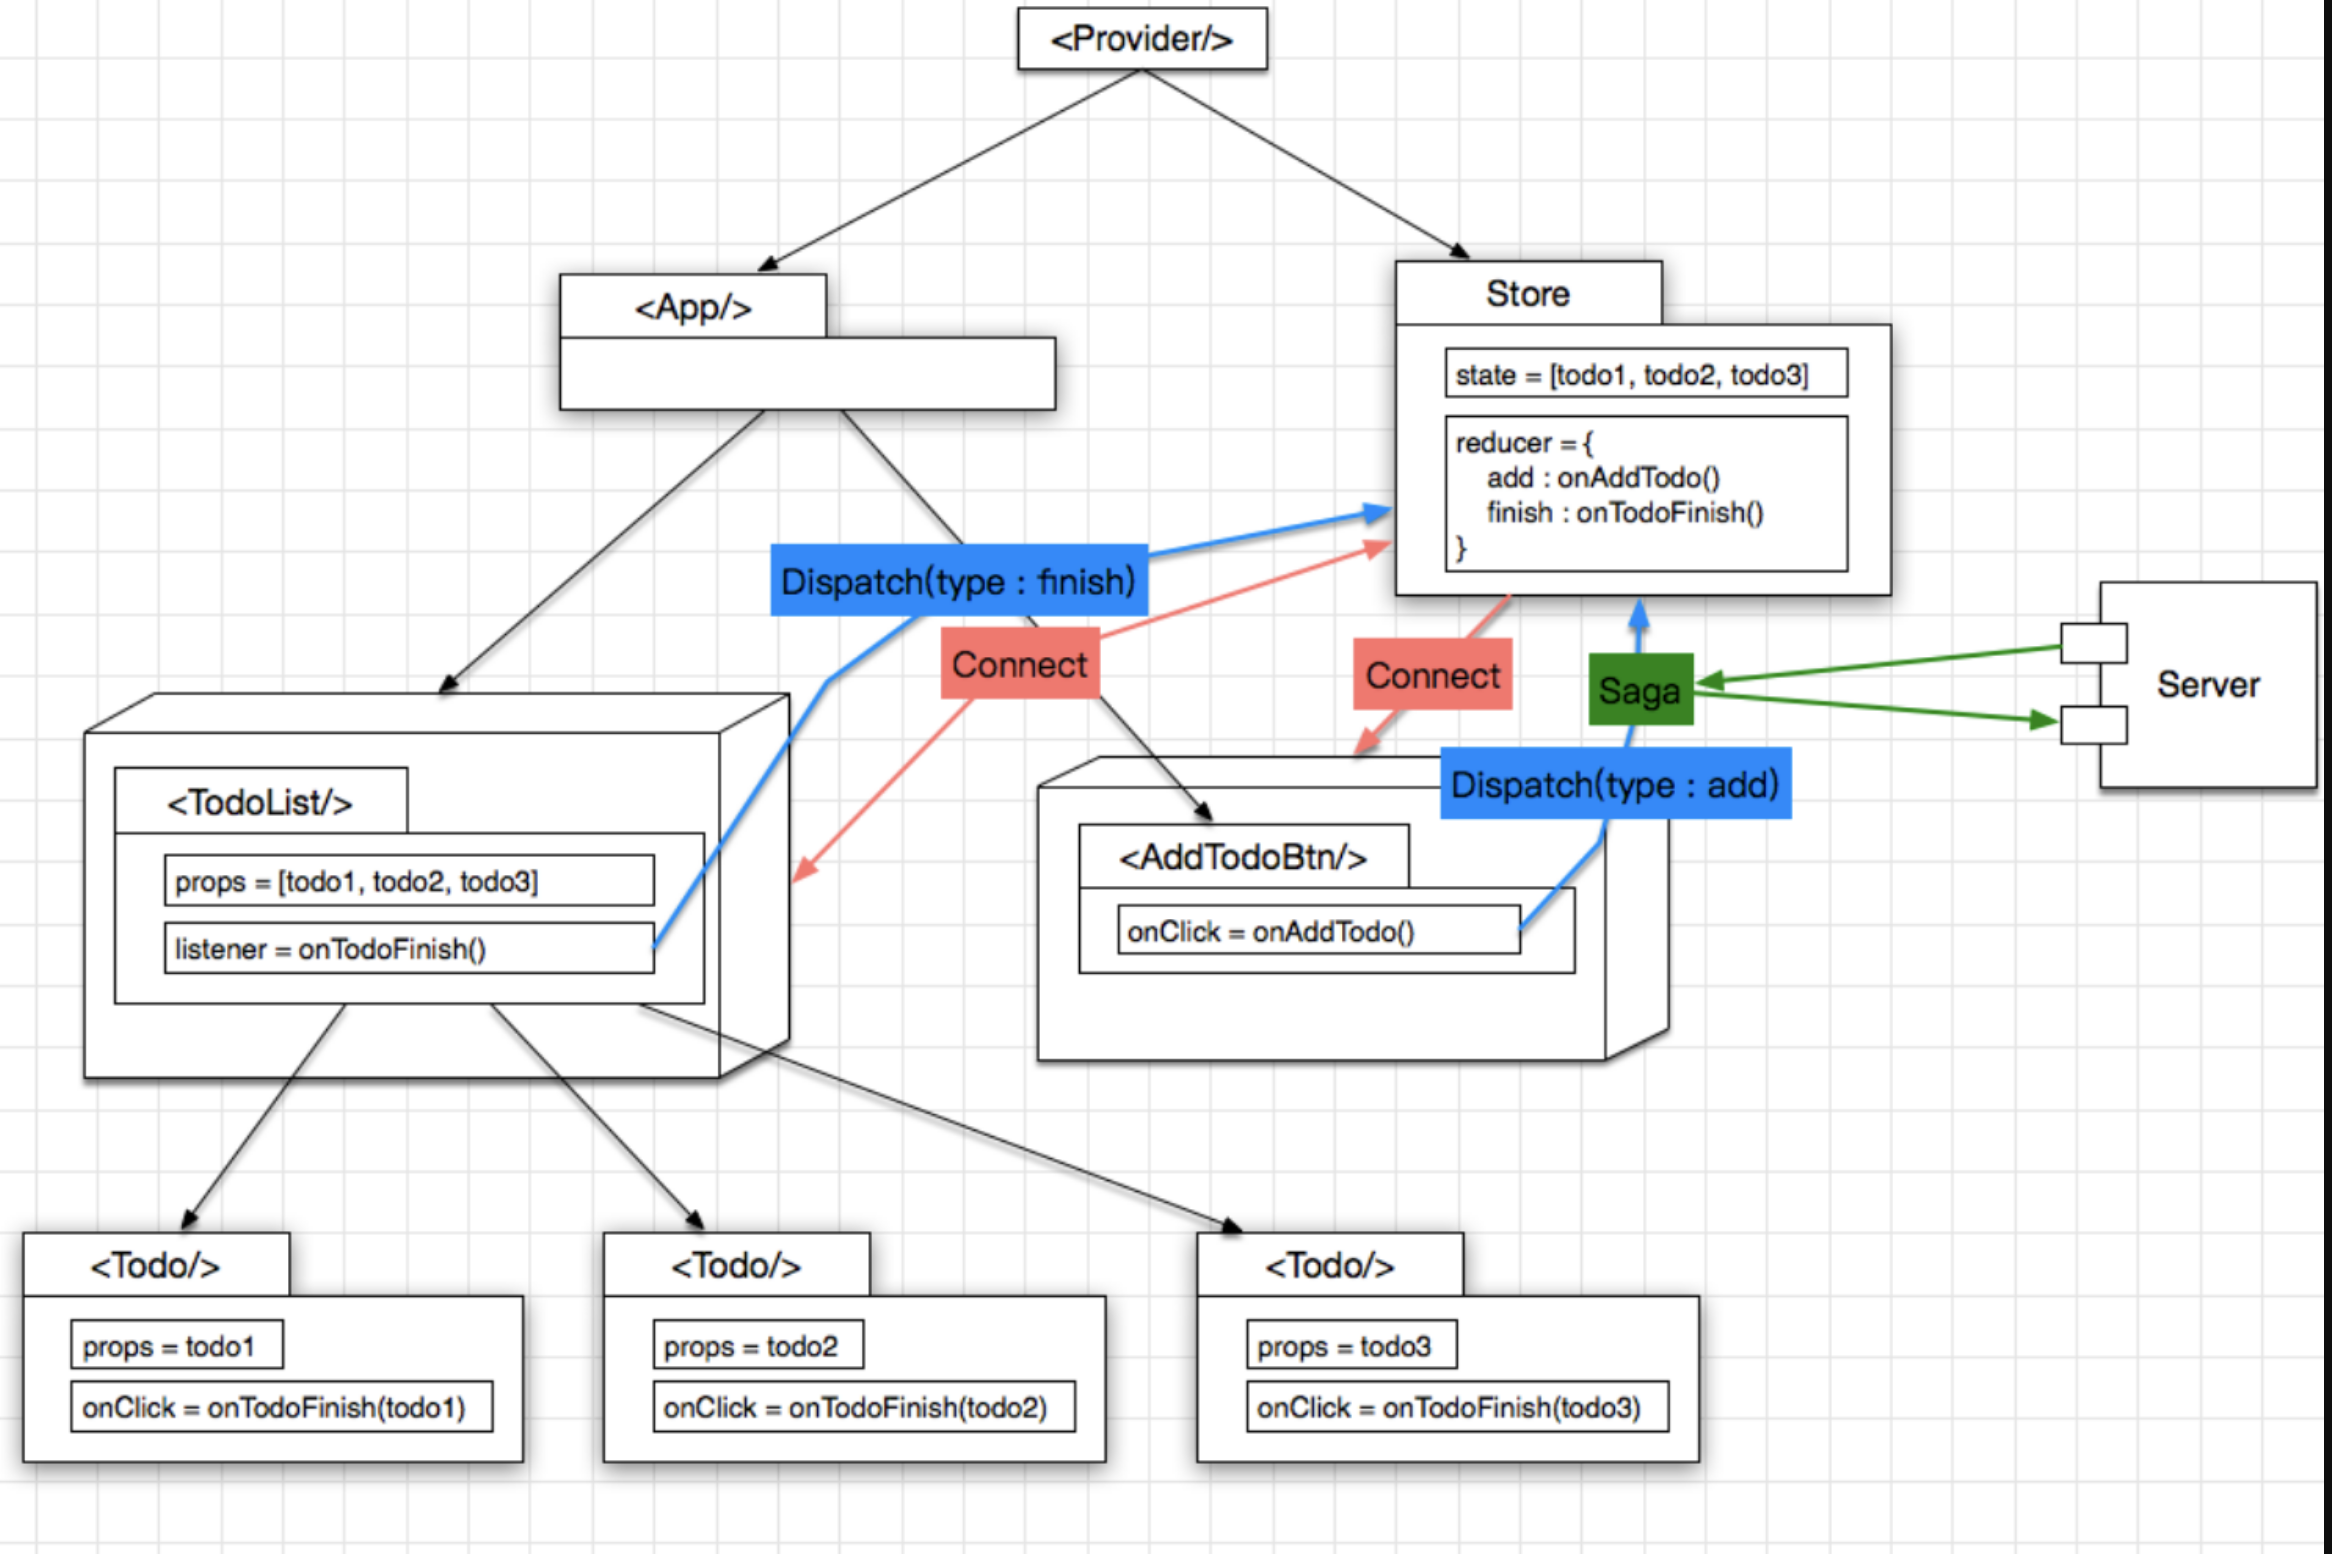
使用 Middleware 拦截 action, 这样一来异步的网络操作也就很方便了, 做成一个 Middleware就行了, 这里使用 redux-saga 这个类库
- 点击创建
Todo 的按钮, 发起一个 type == addTodo 的 action
saga 拦截这个 action, 发起 http 请求, 如果请求成功, 则继续向 reducer 发一个 type == addTodoSucc 的 action, 提示创建成功, 反之则发送 type == addTodoFail 的action 即可
图解二:Dva表示法
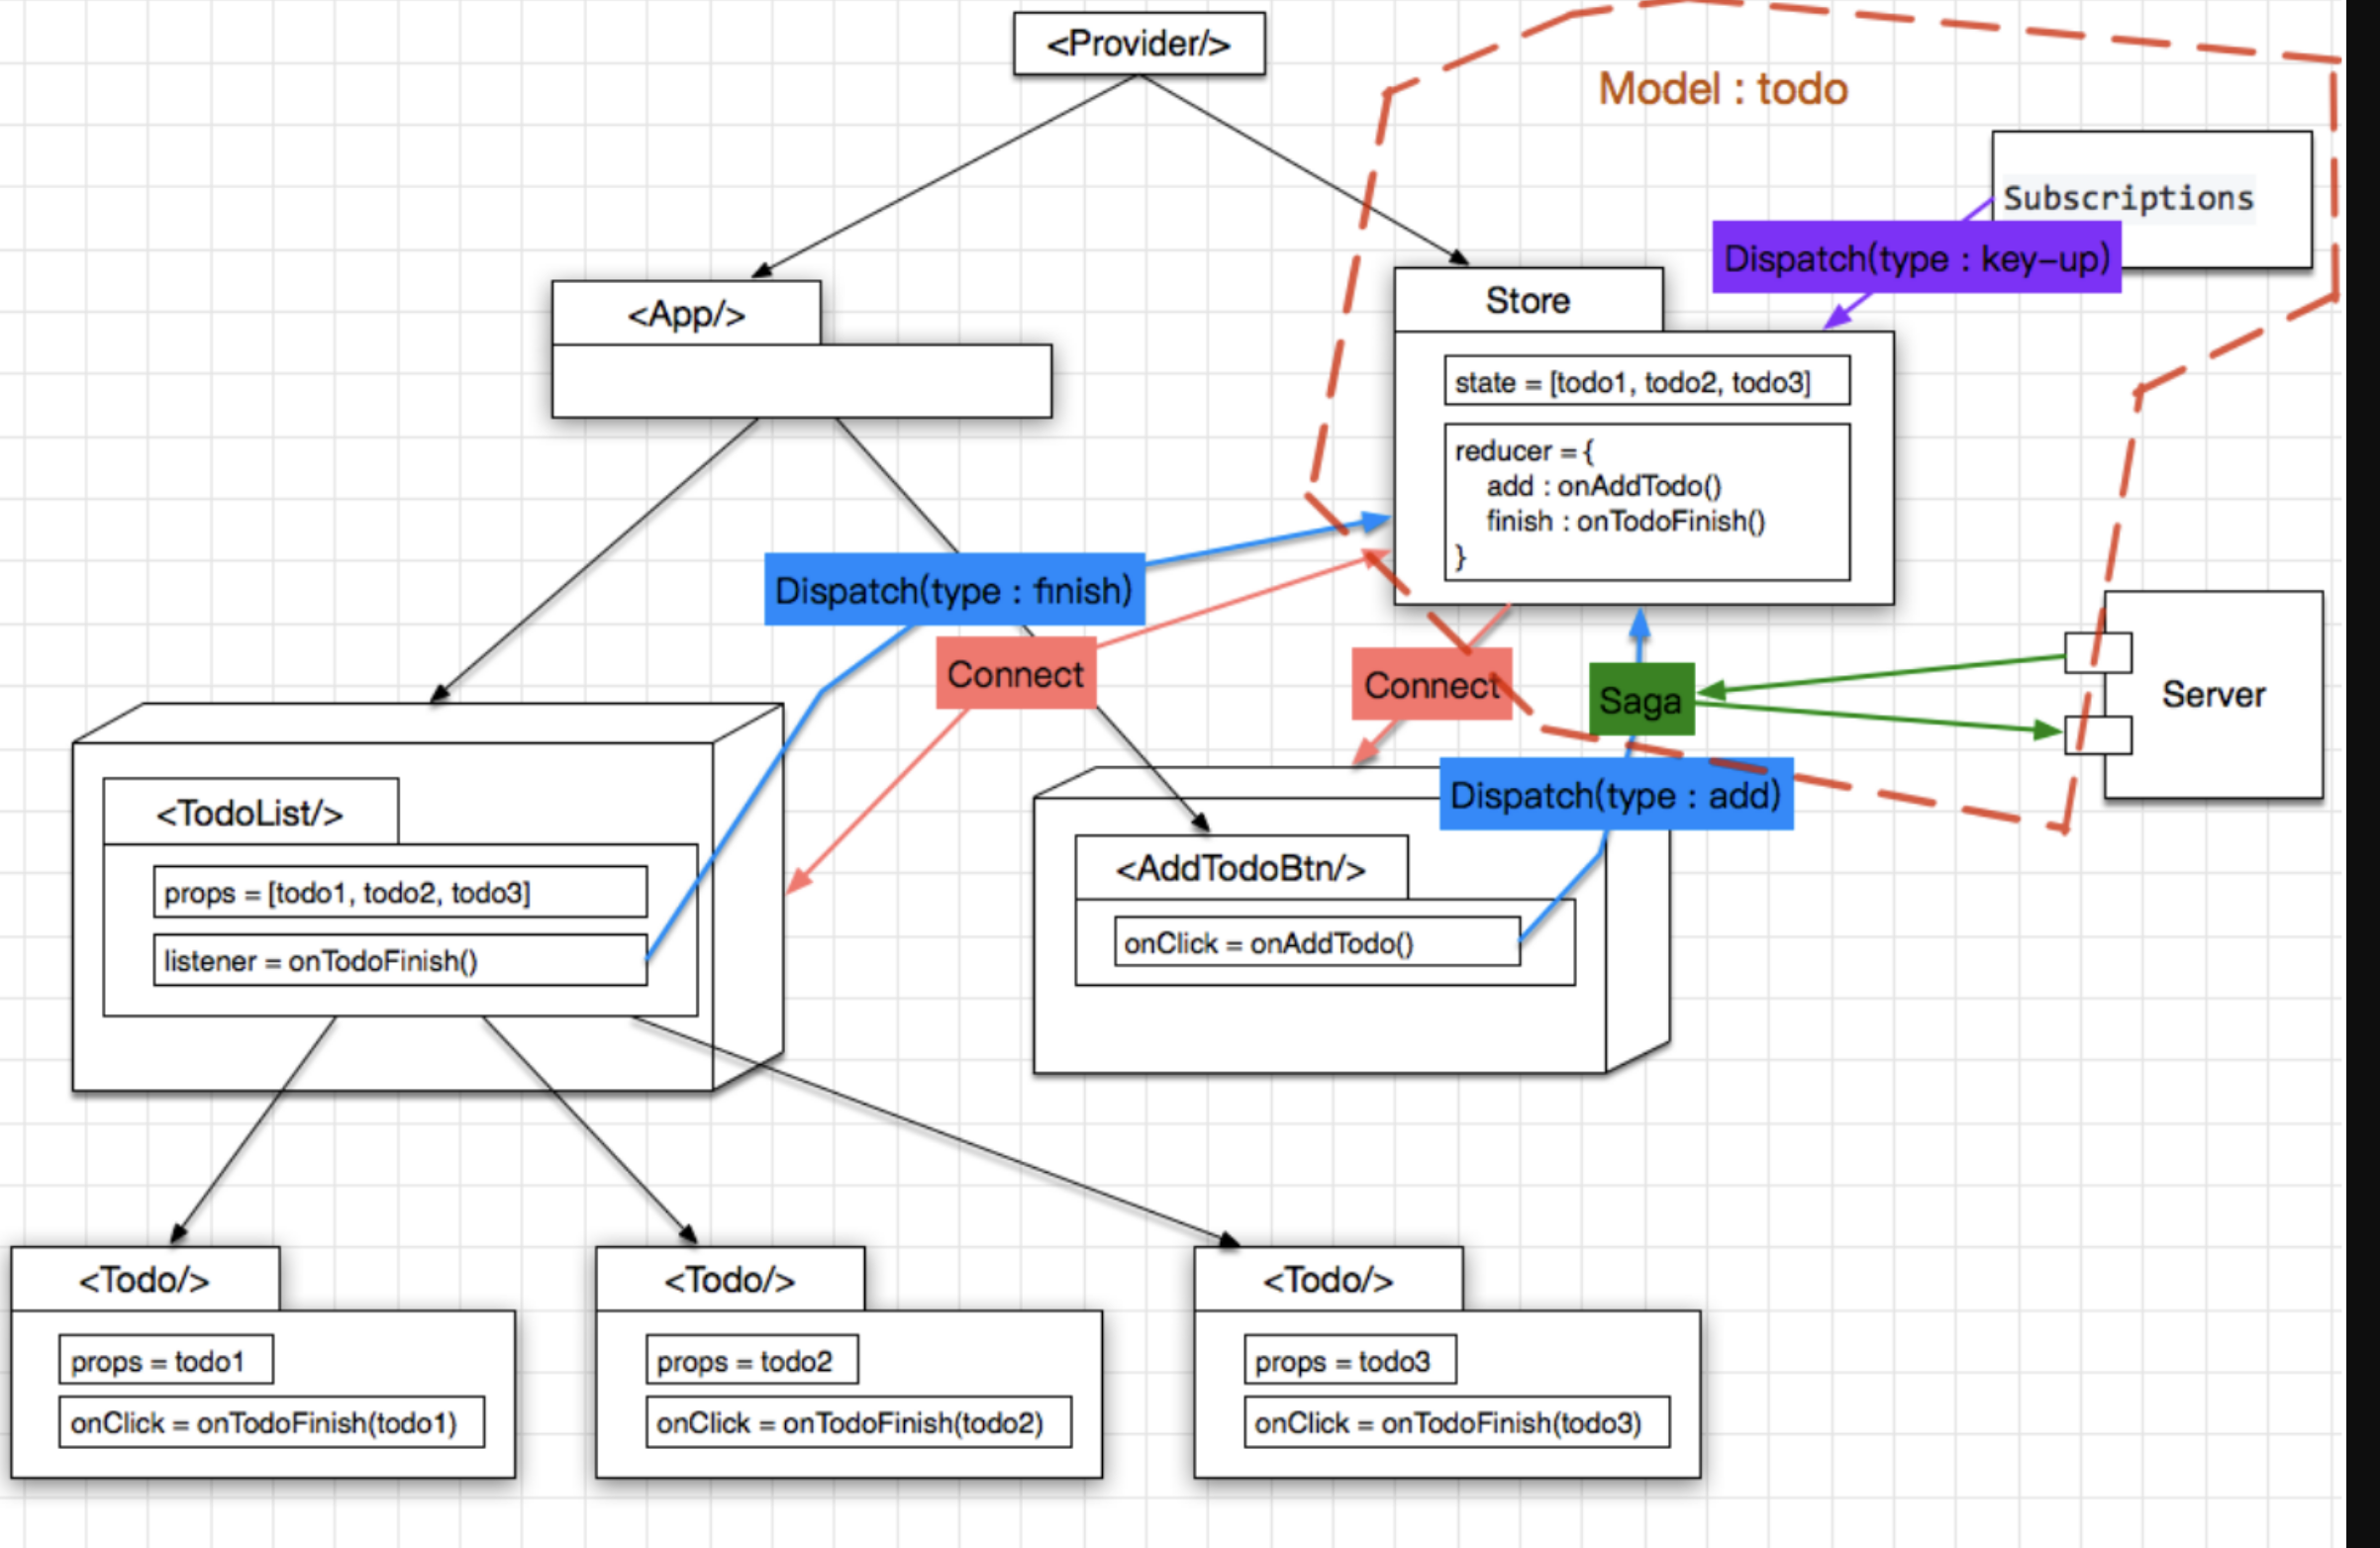
dva做了 3 件很重要的事情
- 把
store 及 saga 统一为一个 model 的概念, 写在一个 js 文件里面
- 增加了一个
Subscriptions, 用于收集其他来源的 action, eg: 键盘操作
model 写法很简约, 类似于 DSL 或者 RoR
三、计数器例子
目录结构介绍
.
├── mock    // mock数据文件夹
├── node_modules // 第三方的依赖
├── public  // 存放公共public文件的文件夹
├── src  // 最重要的文件夹,编写代码都在这个文件夹下
│   ├── assets // 可以放图片等公共资源
│   ├── components // 就是react中的木偶组件
│   ├── models // dva最重要的文件夹,所有的数据交互及逻辑都写在这里
│   ├── routes // 就是react中的智能组件,不要被文件夹名字误导。
│   ├── services // 放请求借口方法的文件夹
│   ├── utils // 自己的工具方法可以放在这边
│   ├── index.css // 入口文件样式
│   ├── index.ejs // ejs模板引擎
│   ├── index.js // 入口文件
│   └── router.js // 项目的路由文件
├── .eslintrc // bower安装目录的配置
├── .editorconfig // 保证代码在不同编辑器可视化的工具
├── .gitignore // git上传时忽略的文件
├── .roadhogrc.js // 项目的配置文件,配置接口转发,css_module等都在这边。
├── .roadhogrc.mock.js // 项目的配置文件
└── package.json // 当前整一个项目的依赖
|
首先是前端的页面,我们使用 class 形式来创建组件,原例子中是使用无状态来创建的。react 创建组件的各种方式,大家可以看React创建组件的三种方式及其区别
我们先修改route/IndexPage.js
import React from 'react';
import { connect } from 'dva';
import styles from './IndexPage.css';

class IndexPage extends React.Component {
  render() {
    const { dispatch } = this.props;

    return (
      <div className={styles.normal}>
        <div className={styles.record}>Highest Record: 1</div>
        <div className={styles.current}>2</div>
        <div className={styles.button}>
          <button onClick={() => {}}>+</button>
        </div>
      </div>
    );
  }
}

export default connect()(IndexPage);
|
同时修改样式routes/IndexPage.css
.normal {
  width: 200px;
  margin: 100px auto;
  padding: 20px;
  border: 1px solid #ccc;
  box-shadow: 0 0 20px #ccc;
}
.record {
  border-bottom: 1px solid #ccc;
  padding-bottom: 8px;
  color: #ccc;
}
.current {
  text-align: center;
  font-size: 40px;
  padding: 40px 0;
}
.button {
  text-align: center;
  button {
    width: 100px;
    height: 40px;
    background: #aaa;
    color: #fff;
  }
}
|
在 model 处理state,在页面里面输出 model 中的 state
- 首先我们在index.js中将
models/example.js,即将model下一行的的注释打开
import dva from 'dva';
import './index.css';
const app = dva();
app.model(require('./models/example'));
app.router(require('./router'));
app.start('#root');
|
接下来我们进入 models/example.js,将namespace 名字改为 count,state 对象加上 record 与 current 属性。如下
export default {
  namespace: 'count',
  state: {
    record: 0,
    current: 0,
  },
  ...
};
|
接着我们来到 routes/indexpage.js 页面,通过的 mapStateToProps 引入相关的 state
import React from 'react';
import { connect } from 'dva';
import styles from './IndexPage.css';
class IndexPage extends React.Component {
render() {
const { dispatch, count } = this.props;
return (
<div className={styles.normal}>
<div className={styles.record}>
Highest Record: {count.record} // 将count的record输出
</div>
<div className={styles.current}>
{count.current}
</div>
<div className={styles.button}>
<button onClick={() => {} } >
+
</button>
</div>
</div>
);
}
}
function mapStateToProps(state) {
return { count: state.count };
}
export default connect(mapStateToProps)(IndexPage);
|
通过 + 发送 action,通过 reducer 改变相应的 state
- 首先我们在
models/example.js,写相应的 reducer
export default {
  ...
  reducers: {
    add1(state) {
      const newCurrent = state.current + 1;
      return { ...state,
        record: newCurrent > state.record ? newCurrent : state.record,
        current: newCurrent,
      };
    },
    minus(state) {
      return { ...state, current: state.current - 1 };
    },
  },
};
|
在页面的模板 routes/IndexPage.js 中 + 号点击的时候,dispatch 一个 action
import React from 'react';
import { connect } from 'dva';
import styles from './IndexPage.css';

class IndexPage extends React.Component {
  render() {
    const { dispatch, count } = this.props;
    return (
      <div className={styles.normal}>
        <div className={styles.record}>Highest Record: {count.record}</div>
        <div className={styles.current}>{count.current}</div>
        <div className={styles.button}>
          <button
+            onClick={() => { dispatch({ type: 'count/add1' });}
          }>+</button>
        </div>
      </div>
    );
  }
}
function mapStateToProps(state) {
  return { count: state.count };
}

export default connect(mapStateToProps)(IndexPage);
|
接下来我们来使用 effect 模拟一个数据接口请求,返回之后,通过 yield put() 改变相应的 state
- 首先我们替换相应的
models/example.js 的 effect
effects: {
    *add(action, { call, put }) {
      yield call(delay, 1000);
      yield put({ type: 'minus' });
    },
},
|
这里的 delay,是我这边写的一个延时的函数,我们在 utils 里面编写一个 utils.js ,一般请求接口的函数都会写在 servers 文件夹中
export function delay(timeout) {
  return new Promise((resolve) => {
    setTimeout(resolve, timeout);
  });
}
|
订阅订阅键盘事件,使用 subscriptions,当用户按住 command+up 时候触发添加数字的 action
- 在
models/example.js 中作如下修改
+import key from 'keymaster';
...
app.model({
  namespace: 'count',
+ subscriptions: {
+   keyboardWatcher({ dispatch }) {
+     key('⌘+up, ctrl+up', () => { dispatch({type:'add'}) });
+   },
+ },
});
|
npm install keymaster --save
|
- 现在你可以按住
command+up 就可以使 current 加1
四、Dva实践
4.1 抽离Model
抽离Model,根据设计页面需求,设计相应的Model
export default {
namespace: 'users',
state: {
list: [],
total: null,
+ loading: false,
+ current: null,
+ currentItem: {},
+ modalVisible: false,
+ modalType: 'create',
},
effects: {
*query(){},
*create(){},
*'delete'(){},
*update(){},
},
reducers: {
+ showLoading(){},
+ showModel(){},
+ hideModel(){},
querySuccess(){},
createSuccess(){},
deleteSuccess(){},
updateSuccess(){},
}
}
|
4.2 设计组件
先设置容器组件的访问路径,再创建组件文件
4.2.1 容器组件
具有监听数据行为的组件,职责是绑定相关联的 model 数据,包含子组件;传入的数据来源于model
import React, { Component, PropTypes } from 'react';
import { connect } from 'dva';
const MyComponent = (props)=>{};
MyComponent.propTypes = {};
function mapStateToProps({ModelA}) {
return {ModelA};
}
export default connect(mapStateToProps)(MyComponent);
|
4.2.2 展示组件
展示通过 props 传递到组件内部数据;传入的数据来源于容器组件向展示组件的props
import React, { Component, PropTypes } from 'react';
const MyComponent = (props)=>{}
MyComponent.propTypes = {};
export default MyComponent;
|
4.2.3 设置路由
import React, { PropTypes } from 'react';
import { Router, Route } from 'dva/router';
import Users from './routes/Users';
export default function({ history }) {
return (
<Router history={history}>
<Route path="/users" component={Users} />
</Router>
);
};
|
容器组件雏形
import React, { PropTypes } from 'react';
function Users() {
return (
<div>User Router Component</div>
);
}
export default Users;
|
4.2.4 设计容器组件
自顶向下的设计方法:先设计容器组件,再逐步细化内部的展示容器
组件的定义方式
class App extends React.Component({});
const App = (props) => ({});
|
容器组件:
import React, { Component, PropTypes } from 'react';
import UserList from '../components/Users/UserList';
import UserSearch from '../components/Users/UserSearch';
import UserModal from '../components/Users/UserModal';
import styles from './style.less'
function Users() {
const userSearchProps = {};
const userListProps = {
total: 3,
current: 1,
loading: false,
dataSource: [
{
name: '张三',
age: 23,
address: '成都',
},
{
name: '李四',
age: 24,
address: '杭州',
},
{
name: '王五',
age: 25,
address: '上海',
},
],
};
const userModalProps = {};
return (
<div className={styles.normal}>
{/* 用户筛选搜索框 */}
<UserSearch {...userSearchProps} />
{/* 用户信息展示列表 */}
<UserList {...userListProps} />
{/* 添加用户 & 修改用户弹出的浮层 */}
<UserModal {...userModalProps} />
</div>
);
}
export default Users;
|
展示组件UserList
import React, { Component, PropTypes } from 'react';
import { Table, message, Popconfirm } from 'antd';
const UserList = ({
total,
current,
loading,
dataSource,
}) => {
const columns = [{
title: '姓名',
dataIndex: 'name',
key: 'name',
render: (text) => <a href="#">{text}</a>,
}, {
title: '年龄',
dataIndex: 'age',
key: 'age',
}, {
title: '住址',
dataIndex: 'address',
key: 'address',
}, {
title: '操作',
key: 'operation',
render: (text, record) => (
<p>
<a onClick={()=>{}}>编辑</a>
<Popconfirm title="确定要删除吗?" onConfirm={()=>{}}>
<a>删除</a>
</Popconfirm>
</p>
),
}];
const pagination = {
total,
current,
pageSize: 10,
onChange: ()=>{},
};
return (
<div>
<Table
columns={columns}
dataSource={dataSource}
loading={loading}
rowKey={record => record.id}
pagination={pagination}
/>
</div>
);
}
export default UserList;
|
4.3 添加Reducer
在整个应用中,只有model中的reducer函数可以直接修改自己所在model的state参数,其余都是非法操作;
并且必须使用return {...state}的形式进行修改
4.3.1 第一步:实现reducer函数
export default {
namespace: 'users',
state: {},
subscriptions: {},
effects: {},
reducers: {
querySuccess(state){
const mock = {
total: 3,
current: 1,
loading: false,
list: [
{
id: 1,
name: '张三',
age: 23,
address: '成都',
},
{
id: 2,
name: '李四',
age: 24,
address: '杭州',
},
{
id: 3,
name: '王五',
age: 25,
address: '上海',
},
]
};
return {...state, ...mock, loading: false};
}
}
}
|
4.3.2 第二步:关联Model中的数据源
import React, { PropTypes } from 'react';
import { connect } from 'dva';
function Users({ location, dispatch, users }) {
const {
loading, list, total, current,
currentItem, modalVisible, modalType
} = users;
const userSearchProps={};
const userListProps={
dataSource: list,
total,
loading,
current,
};
const userModalProps={};
return (
<div className={styles.normal}>
{/* 用户筛选搜索框 */}
<UserSearch {...userSearchProps} />
{/* 用户信息展示列表 */}
<UserList {...userListProps} />
{/* 添加用户 & 修改用户弹出的浮层 */}
<UserModal {...userModalProps} />
</div>
);
}
Users.propTypes = {
users: PropTypes.object,
};
function mapStateToProps({ users }) {
return {users};
}
export default connect(mapStateToProps)(Users);
|
4.3.3 第三步:通过发起Action,在组件中获取Model中的数据
componentDidMount() {
this.props.dispatch({
type: 'model/action',
});
}
subscriptions: {
setup({ dispatch, history }) {
history.listen(location => {
if (location.pathname === '/users') {
dispatch({
type: 'querySuccess',
payload: {}
});
}
});
},
},
|
4.3.4 第四步: 在index.js中添加models
app.model(require('./models/users.js'));
|
4.4 添加Effects
Effects的作用在于处理异步函数,控制数据流程。
因为在真实场景中,数据都来自服务器,需要在发起异步请求获得返回值后再设置数据,更新state。
因此我们往往在Effects中调用reducer
export default {
namespace: 'users',
state: {},
subscriptions: {},
effects: {
*query({ payload }, { select, call, put }) {
yield put({ type: 'showLoading' });
const { data } = yield call(query);
if (data) {
yield put({
type: 'querySuccess',
payload: {
list: data.data,
total: data.page.total,
current: data.page.current
}
});
}
},
},
reducers: {}
}
import request from '../utils/request';
import qs from 'qs';
async function query(params) {
return request(`/api/users?${qs.stringify(params)}`);
}
|
4.5 把请求处理分离到service中
用意在于分离(可复用的)ajax请求
import request from '../utils/request';
import qs from 'qs';
export async function query(params) {
return request(`/api/users?${qs.stringify(params)}`);
}
import {query} from '../services/users';
|
五、使用dva框架和直接使用redux写法的区别
5.1 使用 redux
export const REQUEST_TODO = 'REQUEST_TODO';
export const RESPONSE_TODO = 'RESPONSE_TODO';
const request = count => ({type: REQUEST_TODO, payload: {loading: true, count}});
const response = count => ({type: RESPONSE_TODO, payload: {loading: false, count}});
export const fetch = count => {
return (dispatch) => {
dispatch(request(count));
return new Promise(resolve => {
setTimeout(() => {
resolve(count + 1);
}, 1000)
}).then(data => {
dispatch(response(data))
})
}
}
|
import { REQUEST_TODO, RESPONSE_TODO } from './actions';
export default (state = {
loading: false,
count: 0
}, action) => {
switch (action.type) {
case REQUEST_TODO:
return {...state, ...action.payload};
case RESPONSE_TODO:
return {...state, ...action.payload};
default:
return state;
}
}
|
// app.js
import React from 'react';
import { bindActionCreators } from 'redux';
import { connect } from 'react-redux';

import * as actions from './actions';

const App = ({fetch, count, loading}) => {
  return (
    <div>
      {loading ? <div>loading...</div> : <div>{count}</div>}
      <button onClick={() => fetch(count)}>add</button>
    </div>
  )
}

function mapStateToProps(state) {
  return state;
}

function mapDispatchToProps(dispatch) {
  return bindActionCreators(actions, dispatch)
}

export default connect(mapStateToProps, mapDispatchToProps)(App)
|
import { render } from 'react-dom';
import { createStore, applyMiddleware } from 'redux';
import { Provider } from 'react-redux'
import thunkMiddleware from 'redux-thunk';
import reducer from './app/reducer';
import App from './app/app';
const store = createStore(reducer, applyMiddleware(thunkMiddleware));
render(
<Provider store={store}>
<App/>
</Provider>
,
document.getElementById('app')
)
|
5.2 使用dva
// model.js
export default {
  namespace: 'demo',
  state: {
    loading: false,
    count: 0
  },
  reducers: {
    request(state, payload) {
      return {...state, ...payload};
    },
    response(state, payload) {
      return {...state, ...payload};
    }
  },
  effects: {
    *'fetch'(action, {put, call}) {
      yield put({type: 'request', loading: true});

      let count = yield call((count) => {
        return new Promise(resolve => {
          setTimeout(() => {
            resolve(count + 1);
          }, 1000);
        });
      }, action.count);

      yield put({
        type: 'response',
        loading: false,
        count
      });
    }
  }
}
|
import React from 'react'
import { connect } from 'dva';
const App = ({fetch, count, loading}) => {
return (
<div>
{loading ? <div>loading...</div> : <div>{count}</div>}
<button onClick={() => fetch(count)}>add</button>
</div>
)
}
function mapStateToProps(state) {
return state.demo;
}
function mapDispatchToProps(dispatch) {
return {
fetch(count){
dispatch({type: 'demo/fetch', count});
}
}
}
export default connect(mapStateToProps, mapDispatchToProps)(App)
|
import dva from 'dva';
import model from './model';
import App from './app';
const app = dva();
app.use({});
app.model(model);
app.router(() => <App />);
app.start();
|
- 使用
redux 需要拆分出action模块和reducer模块
dva将action和reducer封装到model中,异步流程采用Generator处理
六、使用axios统一处理
6.1 示例代码
import axios from 'axios';
import NProgress from 'nprogress';
import { notification, message } from 'antd';
import { routerRedux } from 'dva/router';
import store from '../index';
axios.defaults.timeout = 5000
axios.defaults.baseURL = '/api/v1';
axios.defaults.withCredentials = true;
const codeMessage = {
200: '服务器成功返回请求的数据。',
201: '新建或修改数据成功。',
202: '一个请求已经进入后台排队(异步任务)。',
204: '删除数据成功。',
400: '发出的请求有错误,服务器没有进行新建或修改数据的操作。',
401: '用户没有权限(令牌、用户名、密码错误)。',
403: '用户得到授权,但是访问是被禁止的。',
404: '发出的请求针对的是不存在的记录,服务器没有进行操作。',
406: '请求的格式不可得。',
410: '请求的资源被永久删除,且不会再得到的。',
422: '当创建一个对象时,发生一个验证错误。',
500: '服务器发生错误,请检查服务器。',
502: '网关错误。',
503: '服务不可用,服务器暂时过载或维护。',
504: '网关超时。',
};
axios.interceptors.request.use((config) => {
NProgress.start();
return config;
}, (error) => {
return Promise.reject(error);
});
axios.interceptors.response.use((response) => {
NProgress.done();
return response;
}, (error) => {
NProgress.done();
return Promise.reject(error);
});
export default function request (opt) {
return axios(opt)
.then((response) =>
console.log(`【${opt.method} ${opt.url}】请求成功,响应数据:%o`, response);
if (response.data && response.data.code != '0000') {
message.error(response.data.message);
}
return { ...response.data };
})
.catch((error) => {
if (!error.response) {
return console.log('Error', error.message);
}
const status = error.response.status;
const errortext = codeMessage[status] || error.response.statusText;
notification.error({
message: `请求错误 ${status}`,
description: errortext,
});
const { dispatch } = store;
if (status === 401) {
dispatch(routerRedux.push('/user/login'));
} else if (status === 403) {
dispatch(routerRedux.push('/exception/403'));
} else if (status <= 504 && status >= 500) {
dispatch(routerRedux.push('/exception/500'));
} else if (status >= 404 && status < 422) {
dispatch(routerRedux.push('/exception/404'));
}
console.log(`【${opt.method} ${opt.url}】请求失败,响应数据:%o`, error.response);
return { code: status, message: errortext };
});
}
|
6.2 明确响应体
以微信小程序为例,请求响应数据分为两部分:
- 网络请求是否成功;
- 业务场景值。即便网络请求成功了,业务处理上可能有时也会出错,比如校验不通过
我们在拦截响应时要分别对这两部分进行处理
response = {
status: 200,
statusText: 'xxx',
data: {
code: '1001',
message: 'yyy',
data: { },
}
}
|
6.3 依赖包分析
import axios from 'axios';
import NProgress from 'nprogress';
import { notification, message } from 'antd';
import { routerRedux } from 'dva/router';
import store from '../index';
|
import store from '../index';这是 dva 中导出的对象。即下面代码最终导出的 app._store,引入它是因为 dispatch 对象在里面,我们需要 dispatch 对象进行路由跳转
import dva from 'dva';
import { message } from 'antd';
import { createBrowserHistory as createHistory } from 'history';
const app = dva({
history: createHistory(),
});
app.use(createLoading());
app.model(require('./models/app/global').default);
app.router(require('./router').default);
app.start('#root');
export default app._store;
|
6.4 axios 全局配置
axios.defaults.timeout = 5000
axios.defaults.baseURL = '/api/v1';
axios.defaults.withCredentials = true;
|
axios 可以设置很多全局配置,具体可参阅 https://segmentfault.com/a/1190000008470355
6.5 加载 NProgress 过渡组件
/ 添加一个请求拦截器,用于设置请求过渡状态
axios.interceptors.request.use((config) => {
NProgress.start();
return config;
}, (error) => {
return Promise.reject(error);
});
axios.interceptors.response.use((response) => {
NProgress.done();
return response;
}, (error) => {
NProgress.done();
return Promise.reject(error);
});
|
NProgress 的使用主要有两个方法,当调用 NProgress.start(); 时在浏览器顶部就会出现蓝色小条,当调用 NProgress.done(); 蓝色小条就会消失。我们分别在请求开始和接收到响应调用这两个方法

6.6 网络请求成功处理
.then((response) =>
console.log(`【${opt.method} ${opt.url}】请求成功,响应数据:%o`, response);
if (response.data && response.data.code != '0000') {
message.error(response.data.message);
}
return { ...response.data };
})
|
网络请求状态码为 200-300 表示成功,此时还应该判断业务处理是否成功。这个根据具体项目具体规定,比如微信小程序有一套场景值。在实际项目中可以自行规定 code = '0000' 业务处理完全没问题,code = '1111' 校验不通过,code = '2222' 数据库出错等等。
- 最后别忘了要返回具体对象
{ ...response.data }
6.7 网络请求失败处理
const codeMessage = {
200: '服务器成功返回请求的数据。',
201: '新建或修改数据成功。',
202: '一个请求已经进入后台排队(异步任务)。',
204: '删除数据成功。',
400: '发出的请求有错误,服务器没有进行新建或修改数据的操作。',
401: '用户没有权限(令牌、用户名、密码错误)。',
403: '用户得到授权,但是访问是被禁止的。',
404: '发出的请求针对的是不存在的记录,服务器没有进行操作。',
406: '请求的格式不可得。',
410: '请求的资源被永久删除,且不会再得到的。',
422: '当创建一个对象时,发生一个验证错误。',
500: '服务器发生错误,请检查服务器。',
502: '网关错误。',
503: '服务不可用,服务器暂时过载或维护。',
504: '网关超时。',
};
.catch((error) => {
if (!error.response) {
return console.log('Error', error.message);
}
const status = error.response.status;
const errortext = codeMessage[status] || error.response.statusText;
notification.error({
message: `请求错误 ${status}`,
description: errortext,
});
const { dispatch } = store;
if (status === 401) {
dispatch(routerRedux.push('/user/login'));
} else if (status === 403) {
dispatch(routerRedux.push('/exception/403'));
} else if (status <= 504 && status >= 500) {
dispatch(routerRedux.push('/exception/500'));
} else if (status >= 404 && status < 422) {
dispatch(routerRedux.push('/exception/404'));
}
console.log(`【${opt.method} ${opt.url}】请求失败,响应数据:%o`, error.response);
return { code: status, message: errortext };
});
|
- 网络请求失败,首先需要根据
status 打印提示消息,告诉用户为什么请求失败。如响应码为 401,那么提示用户的文字就会是 用户没有权限(令牌、用户名、密码错误)
- 如果是
401 错误,表示用户没有权限访问或者用户名密码输入错误,应该跳转到登录页面:dispatch(routerRedux.push('/user/login'));
七、更多参考