
一、调试工具
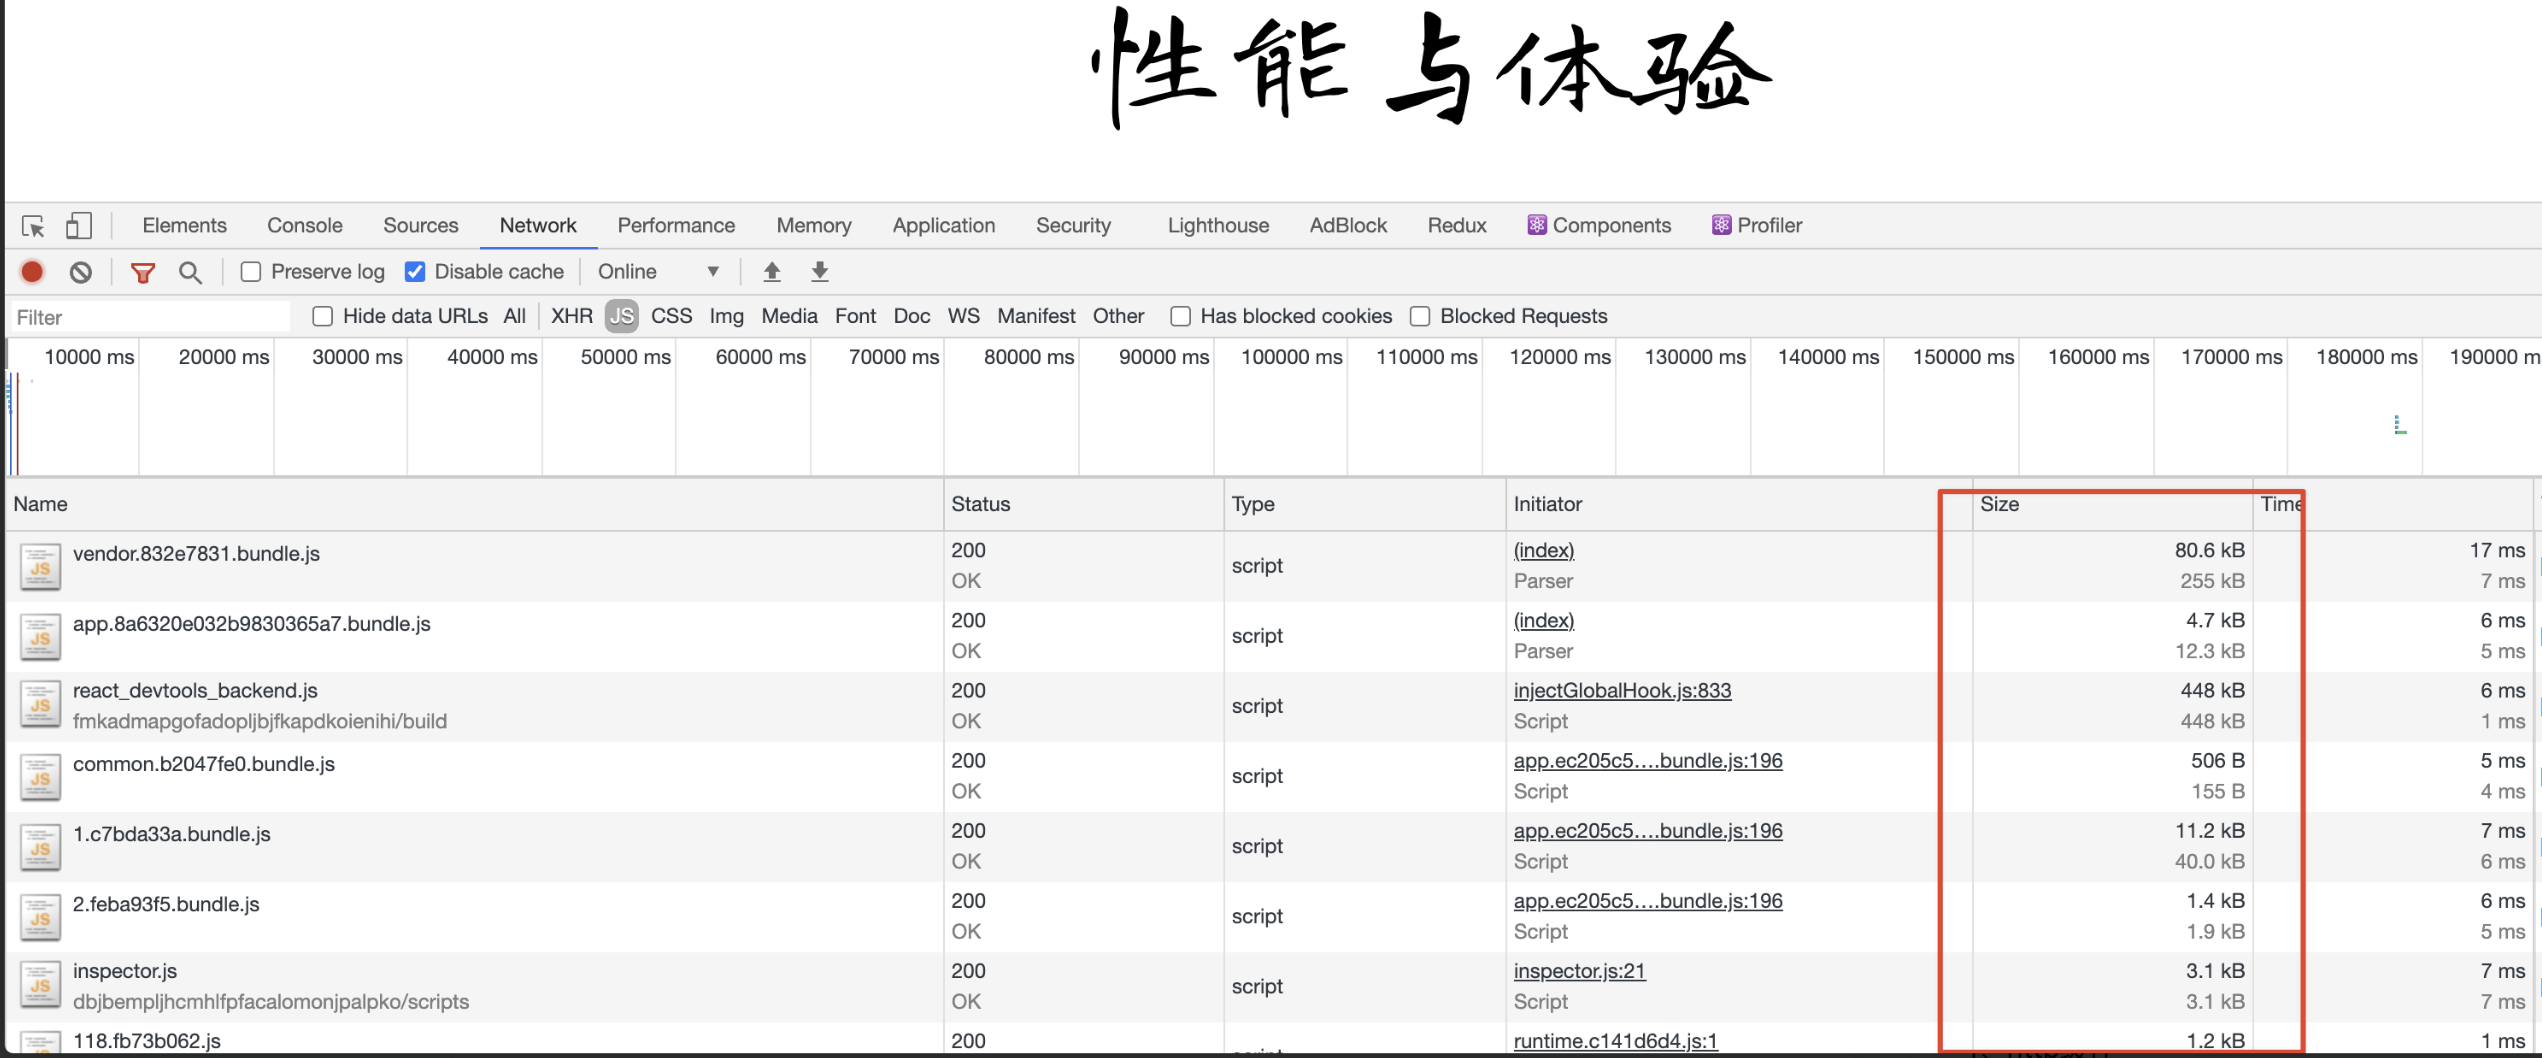
1、Network
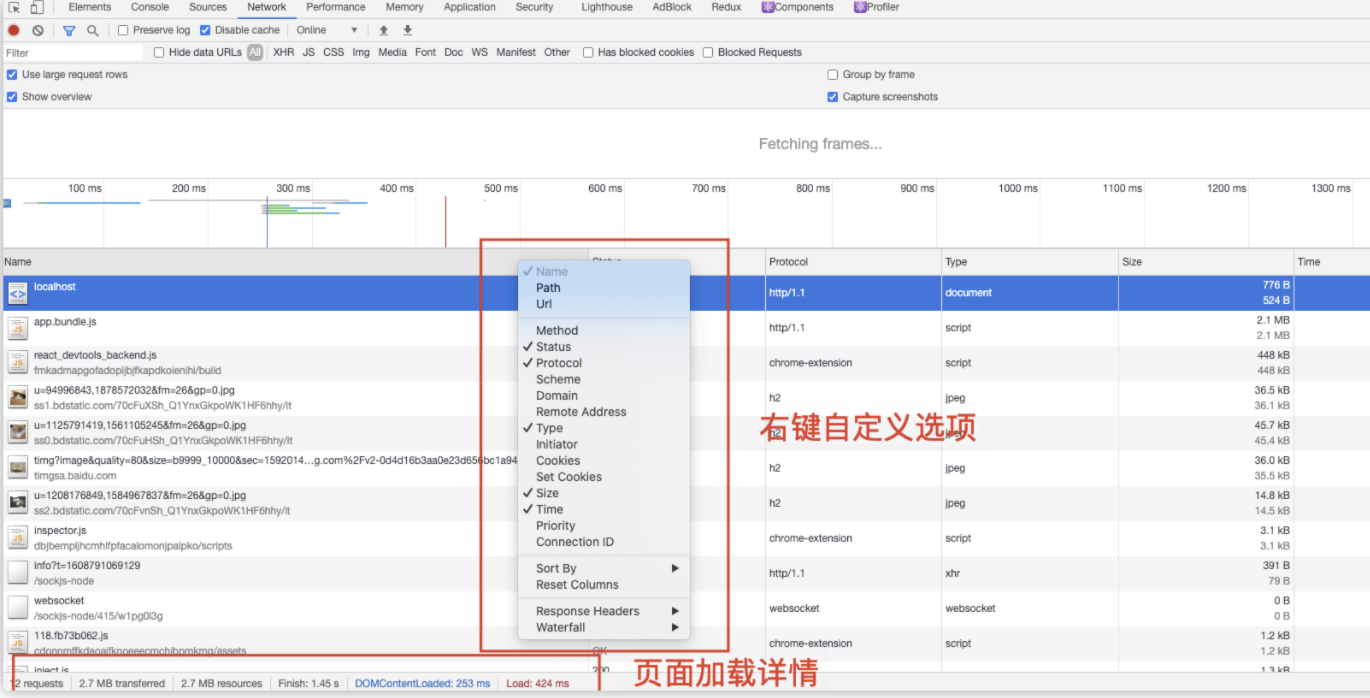
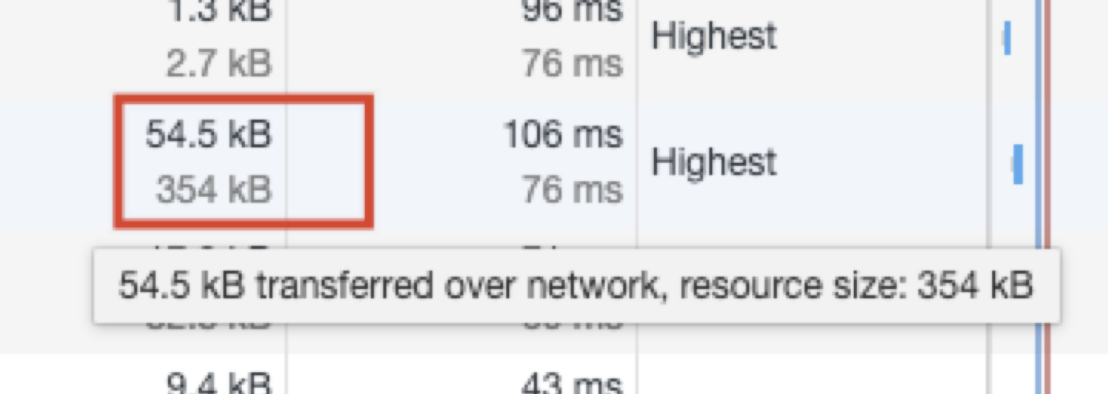
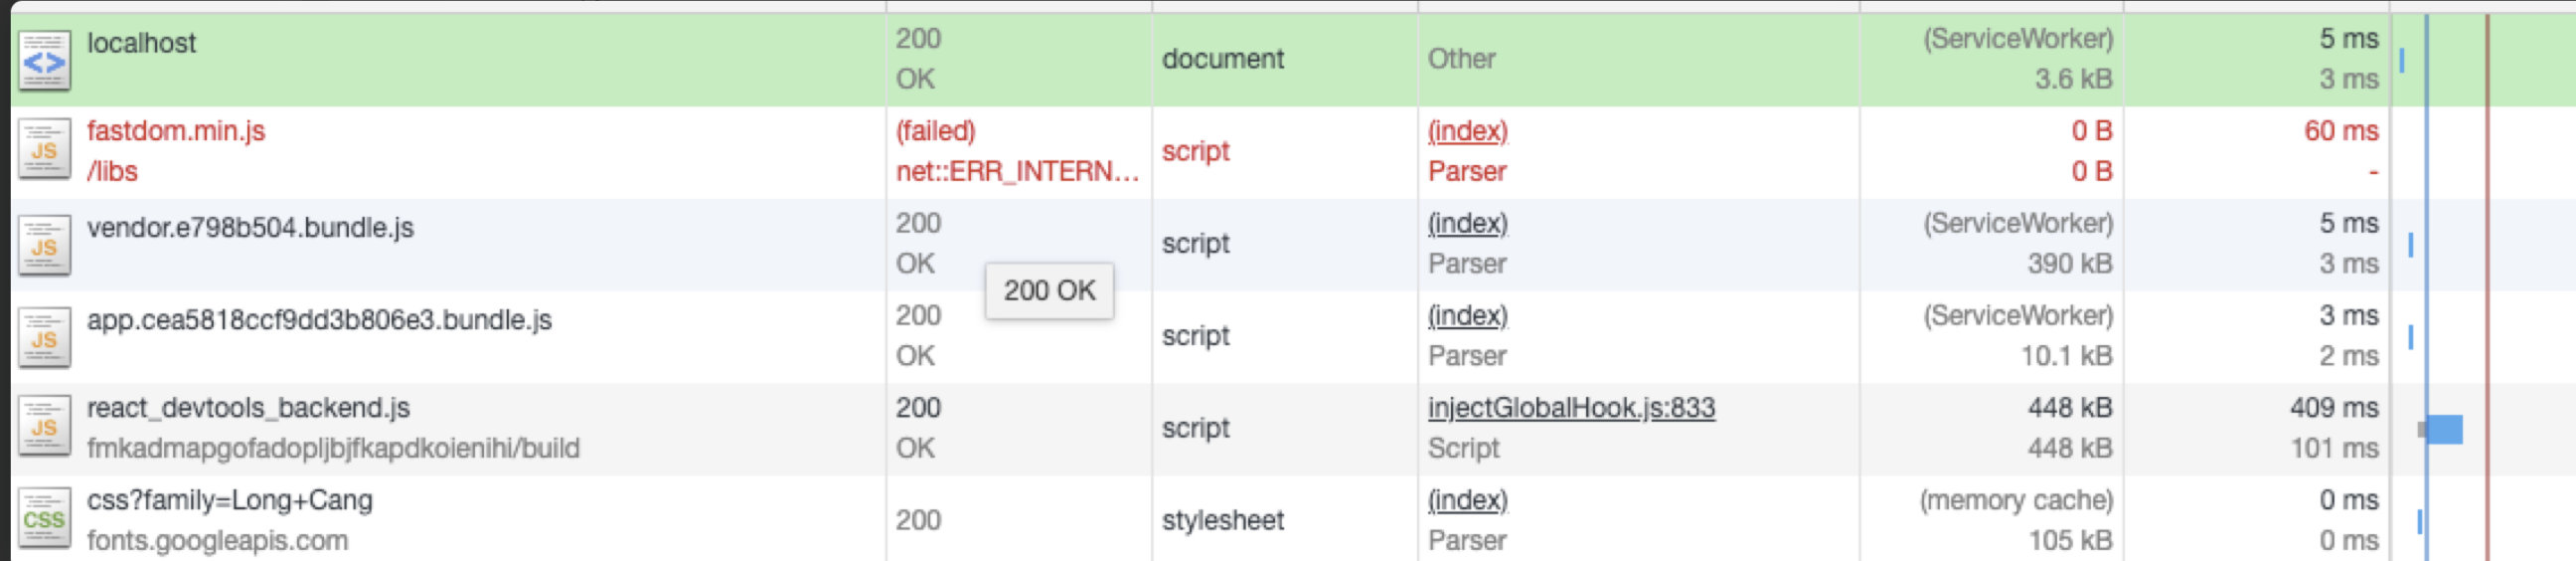
这里可以看到资源加载详情,初步评估影响页面性能的因素。鼠标右键可以自定义选项卡,页面底部是当前加载资源的一个概览。DOMContentLoaded DOM渲染完成的时间,Load:当前页面所有资源加载完成的时间
思考:如何判断哪些资源对当前页面加载无用,做对应优化?
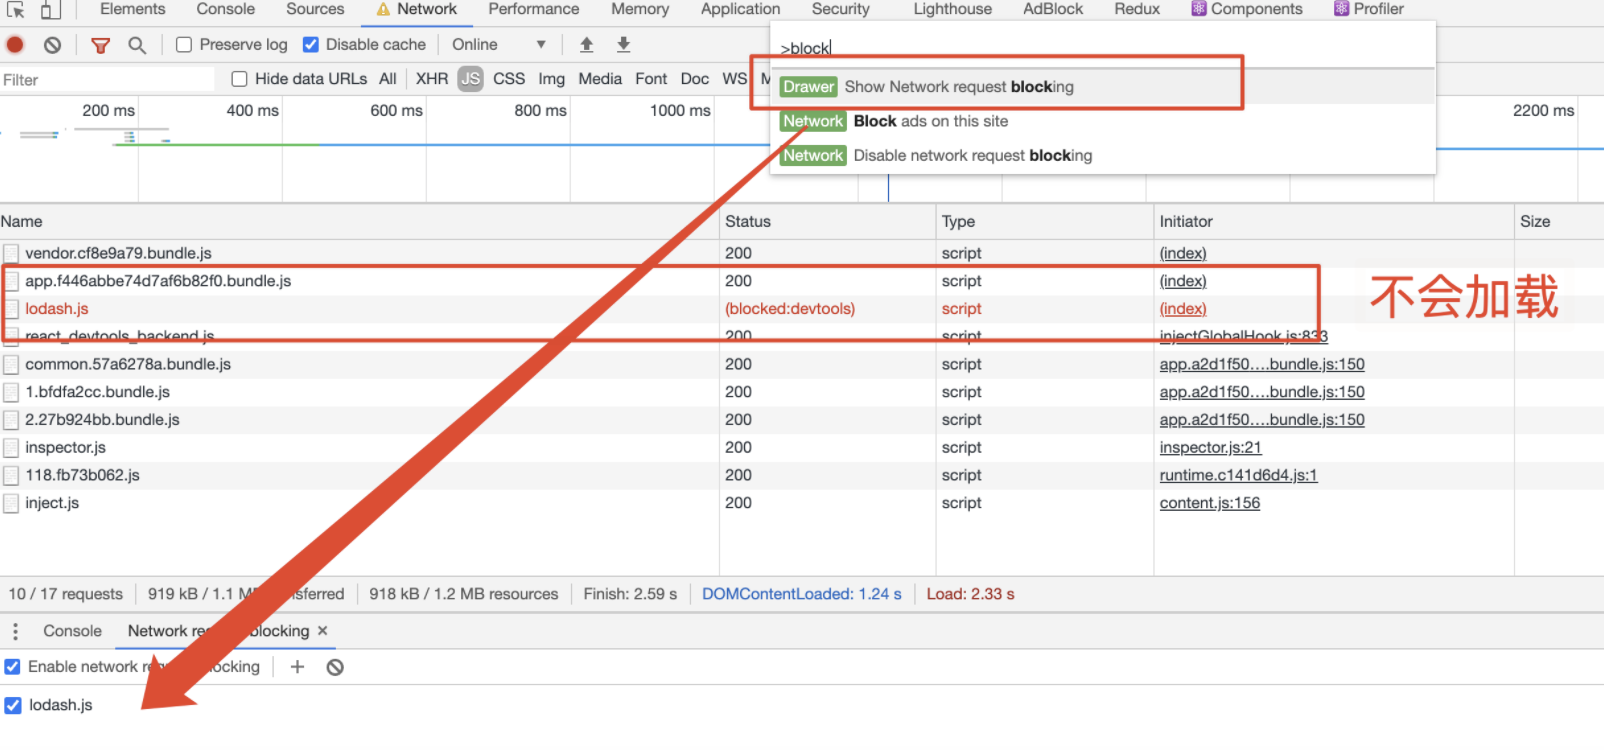
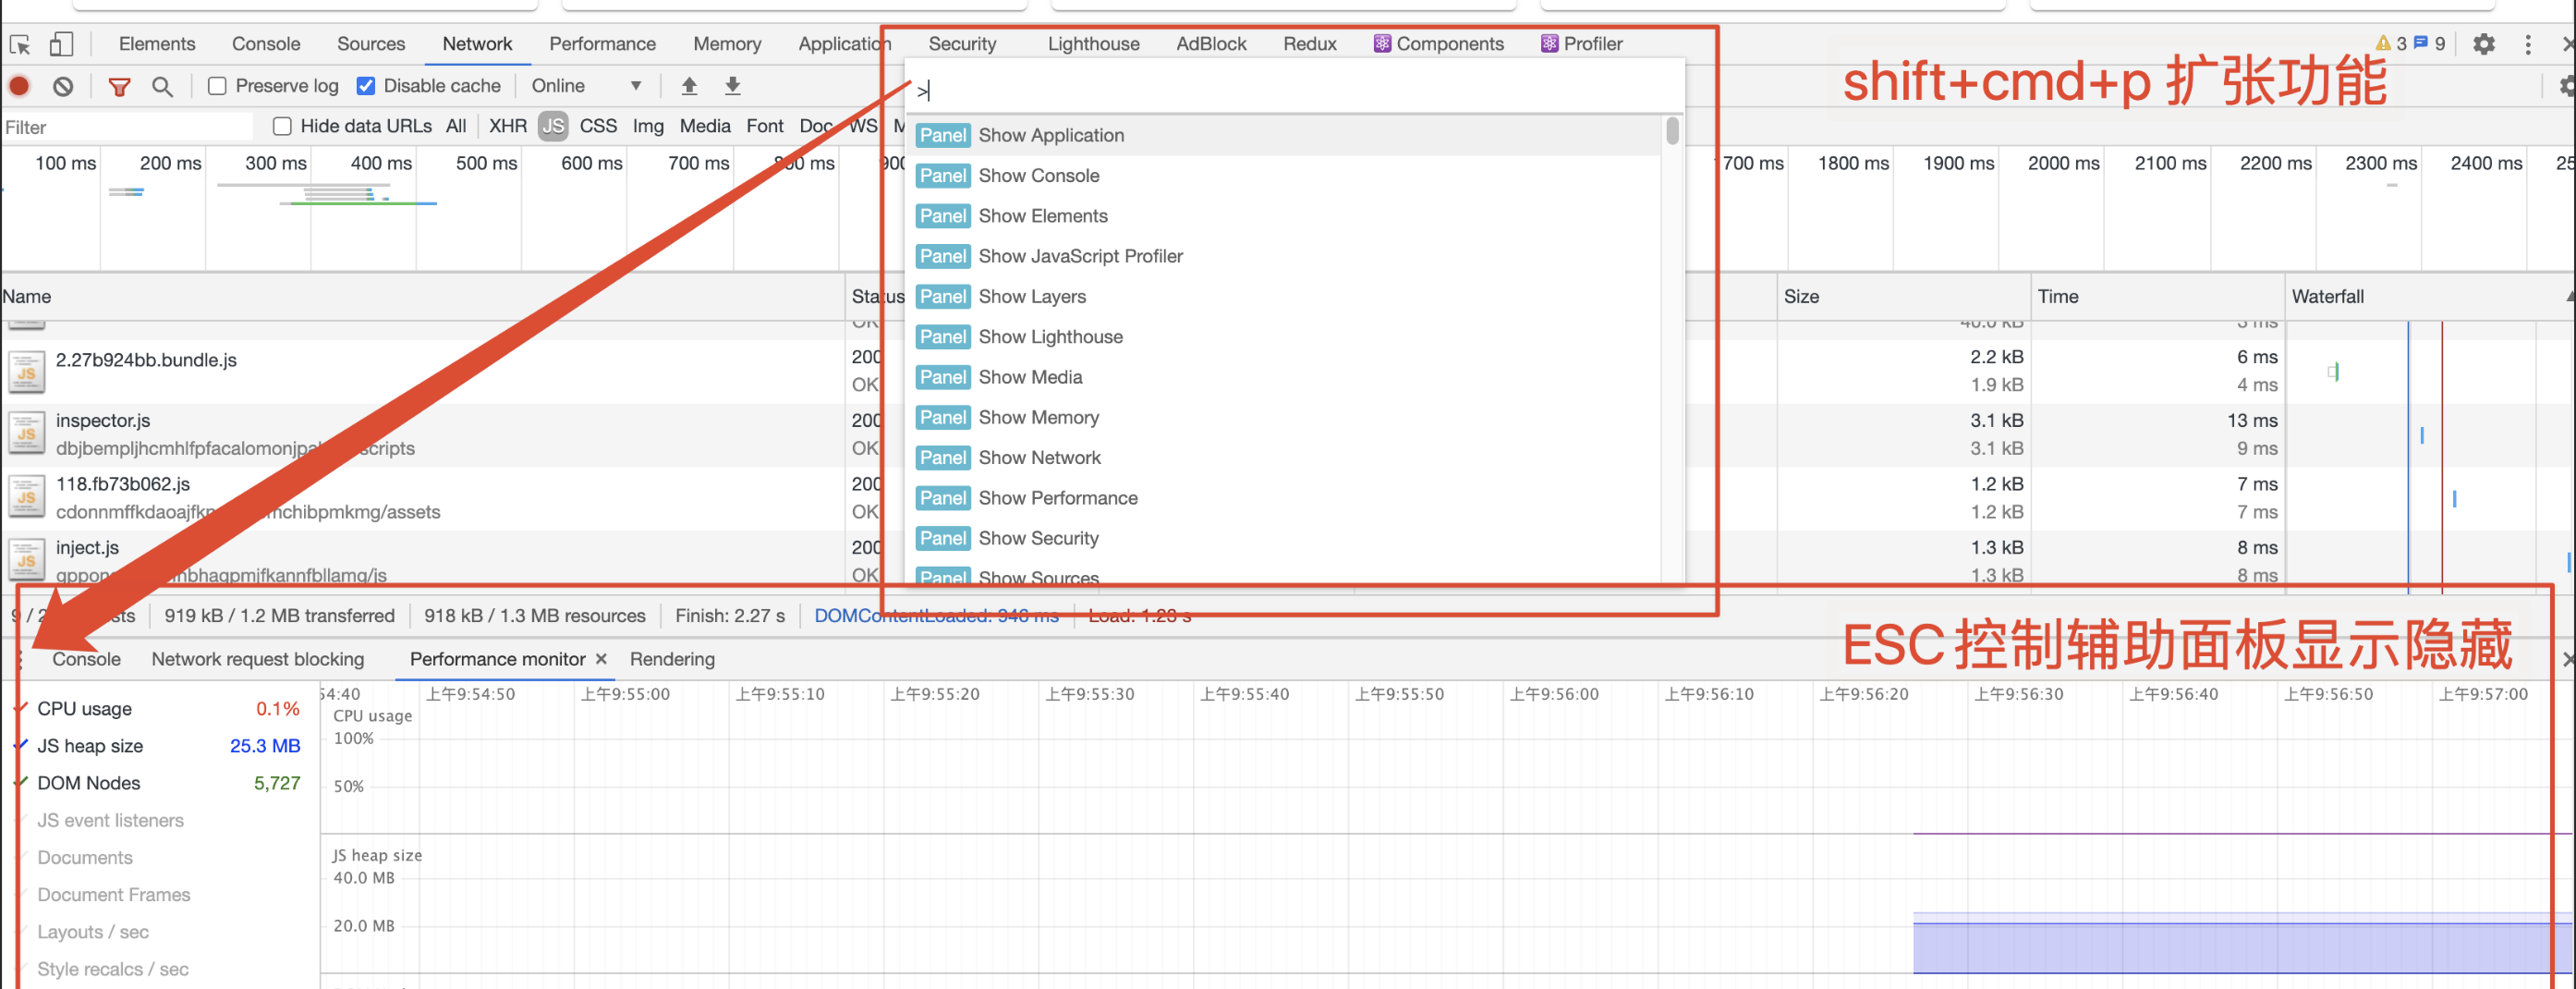
shift + cmd + P 调出控制台的扩展工具,添加规则
监控页面性能变化
瀑布流waterfal

Queueing浏览器将资源放入队列时间Stalled因放入队列时间而发生的停滞时间DNS LookupDNS解析时间Initial connection建立HTTP连接的时间SSL浏览器与服务器建立安全性连接的时间TTFB等待服务端返回数据的时间Content Download浏览器下载资源的时间
2、Lighthouse
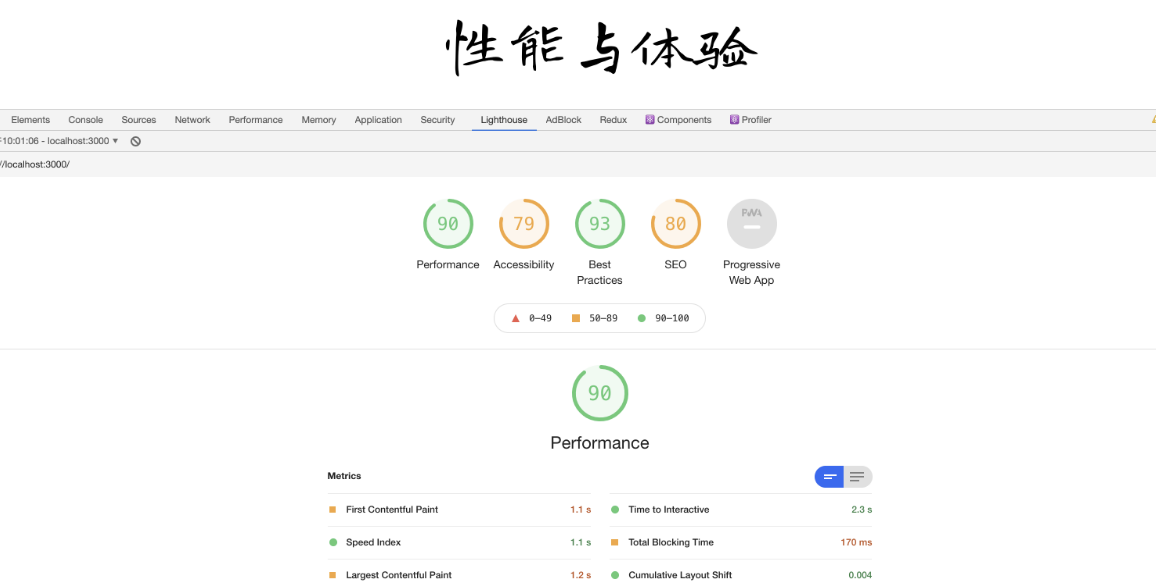
First Contentful Paint首屏渲染时间,1s以内绿色Speed Index速度指数,4s以内绿色Time to Interactive到页面可交换的时间
根据chrome的一些策略自动对网站做一个质量评估,并且会给出一些优化的建议
3、Peformance
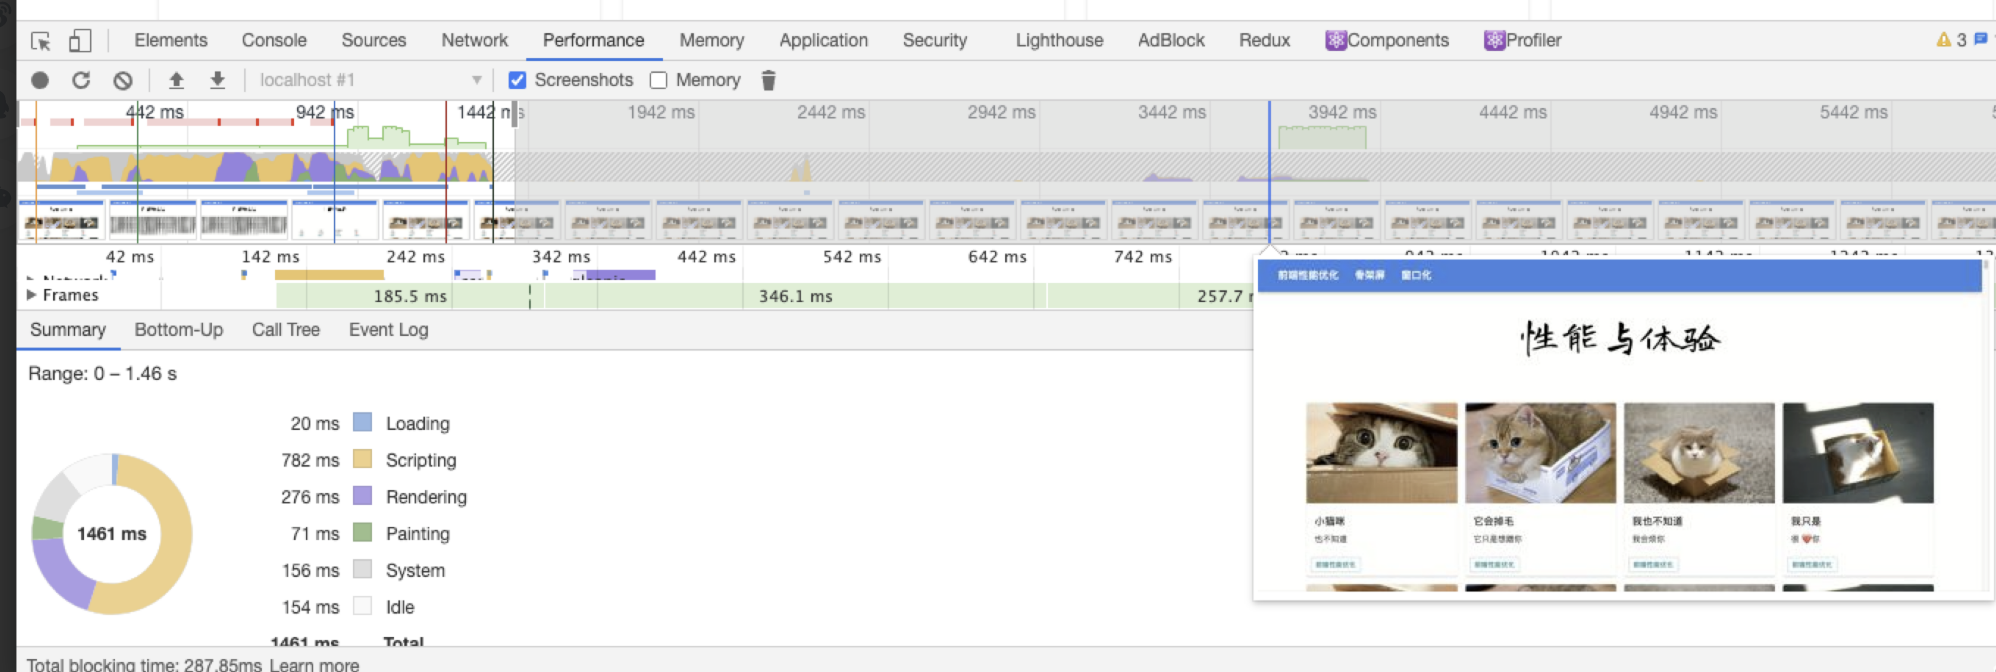
对网站最专业的分析
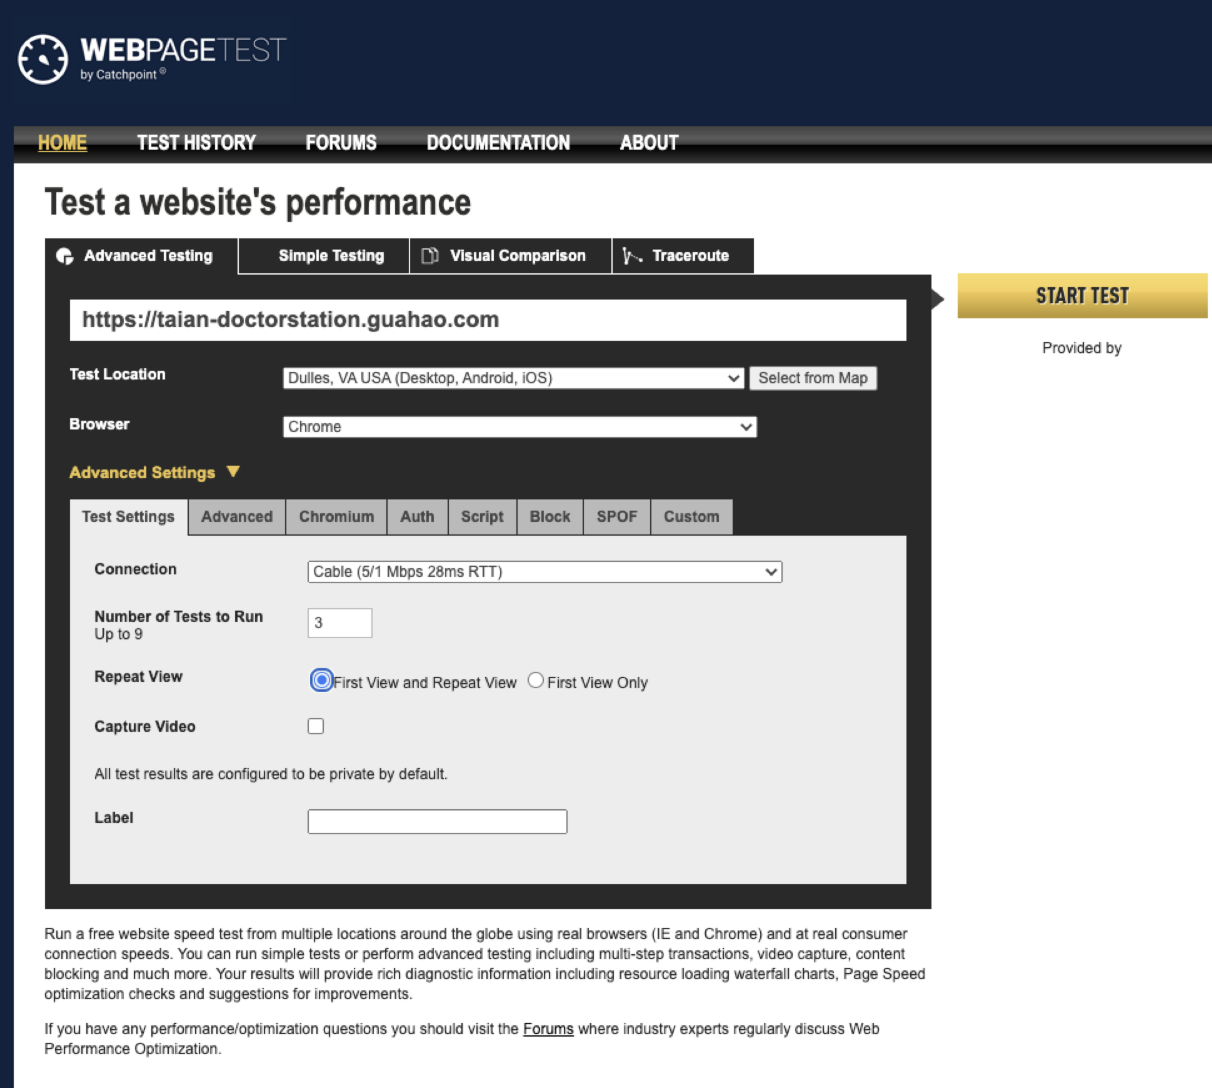
4、webPageTest
可以模拟不同场景下访问的情况,比如模拟不同浏览器、不同国家等等,在线测试地址:webPageTest

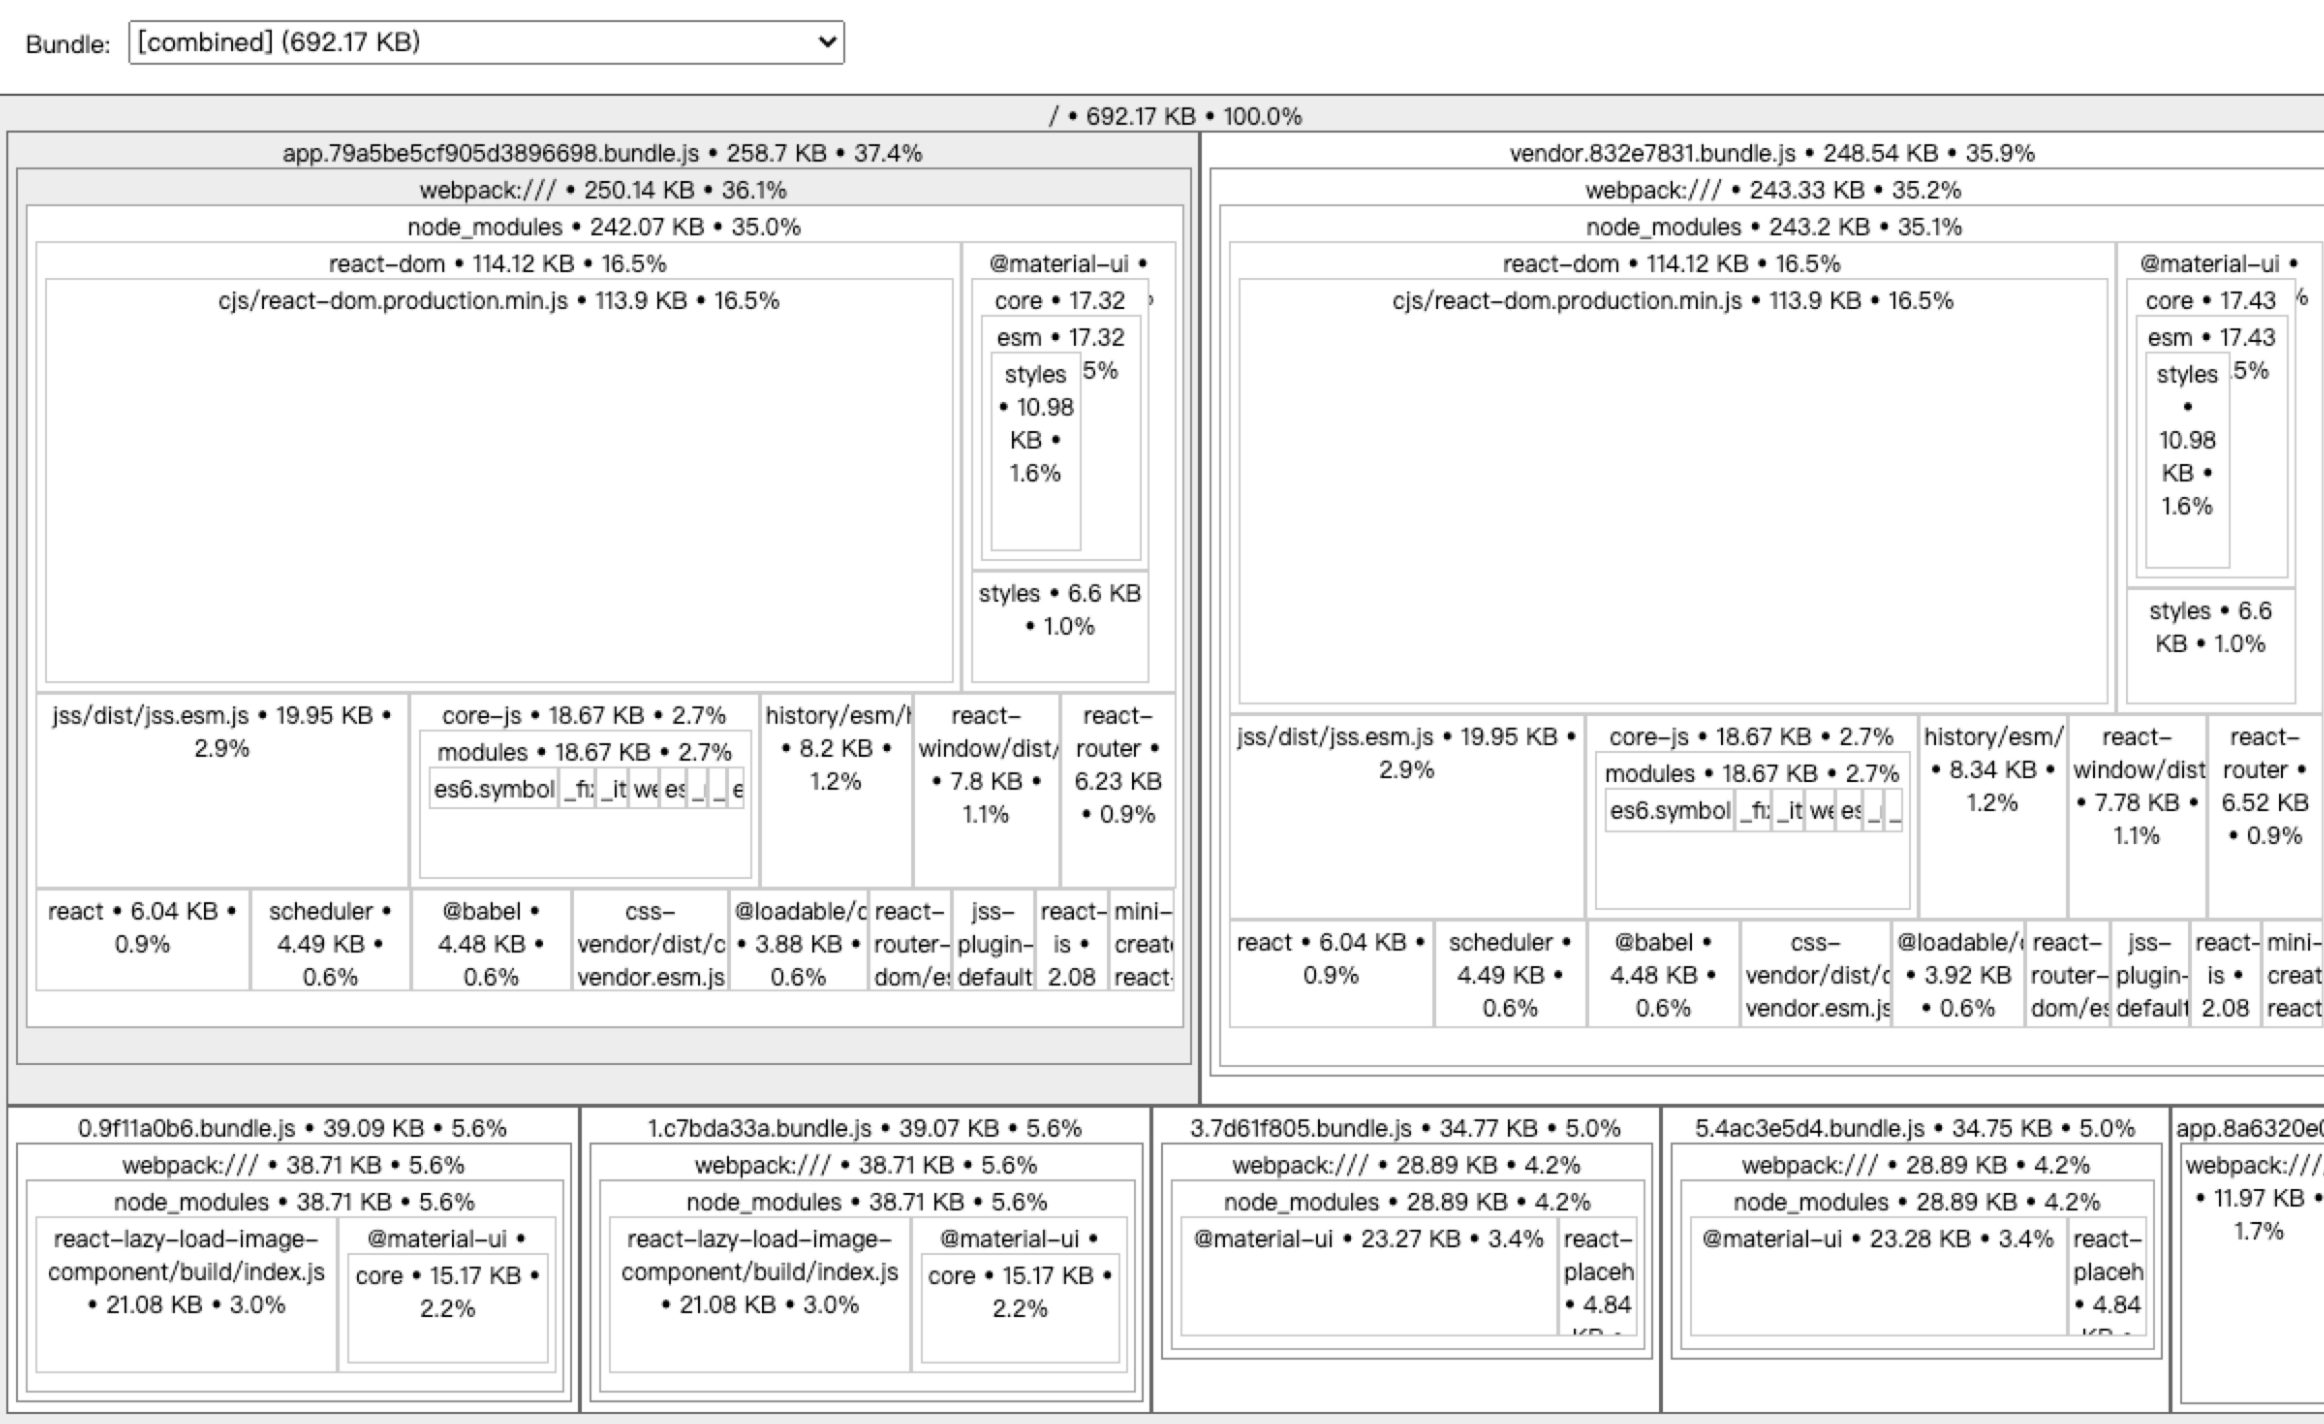
5、资源打包分析
webpack-bundle-analyzer
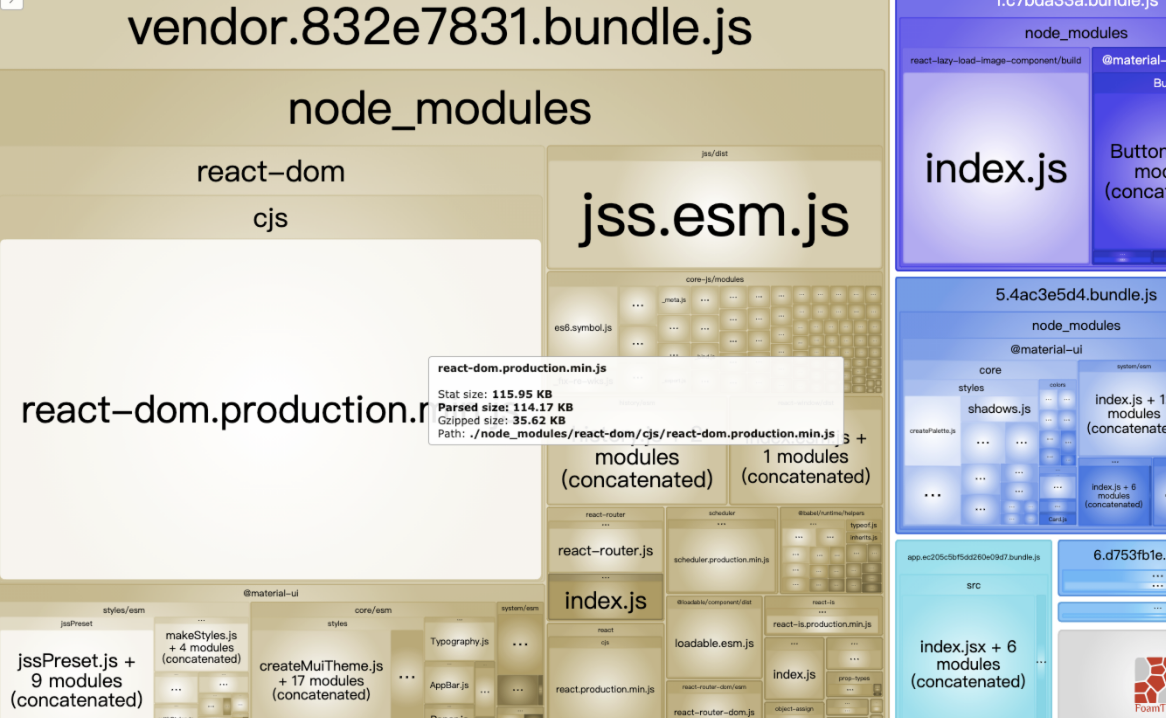
npm install --save-dev webpack-bundle-analyzer |
开启source-map
webpack.config.js
module.exports = { |
package.json
"analyze": "source-map-explorer 'build/*.js'", |
npm run analyze
二、WEB API
工欲善其事,必先利其器。浏览器提供的一些分析API至关重要
1、监听视窗激活状态
// 窗口激活状态监听 |
其实有很多隐藏的api,这里大家有兴趣的可以去试试看:
2、观察长任务(performance 中Task)
const observer = new PerformanceObserver((list) => { |
3、监听网络变化
网络变化时给用户反馈网络问题,有时候看直播的时候自己的网络卡顿,直播平台也会提醒你或者自动给你切换清晰度
var connection = navigator.connection || navigator.mozConnection || navigator.webkitConnection; |
4、计算DOMContentLoaded时间
window.addEventListener('DOMContentLoaded', (event) => { |
5、更多计算规则
DNS解析耗时:domainLookupEnd - domainLookupStartTCP连接耗时:connectEnd - connectStartSSL安全连接耗时:connectEnd - secureConnectionStart- 网络请求耗时 (
TTFB):responseStart - requestStart - 数据传输耗时:
responseEnd - responseStart DOM解析耗时:domInteractive - responseEnd- 资源加载耗时:
loadEventStart - domContentLoadedEventEnd First Byte时间:responseStart - domainLookupStart- 白屏时间:
responseEnd - fetchStart - 首次可交互时间:
domInteractive - fetchStart DOM Ready时间:domContentLoadEventEnd - fetchStart- 页面完全加载时间:
loadEventStart - fetchStart http头部大小:transferSize - encodedBodySize- 重定向次数:
performance.navigation.redirectCount - 重定向耗时:
redirectEnd - redirectStart
三、雅虎军规
关于雅虎军规,你知道的有多少条,平时写用到的又有哪些?针对以下规则,我们可以做很多优化工作
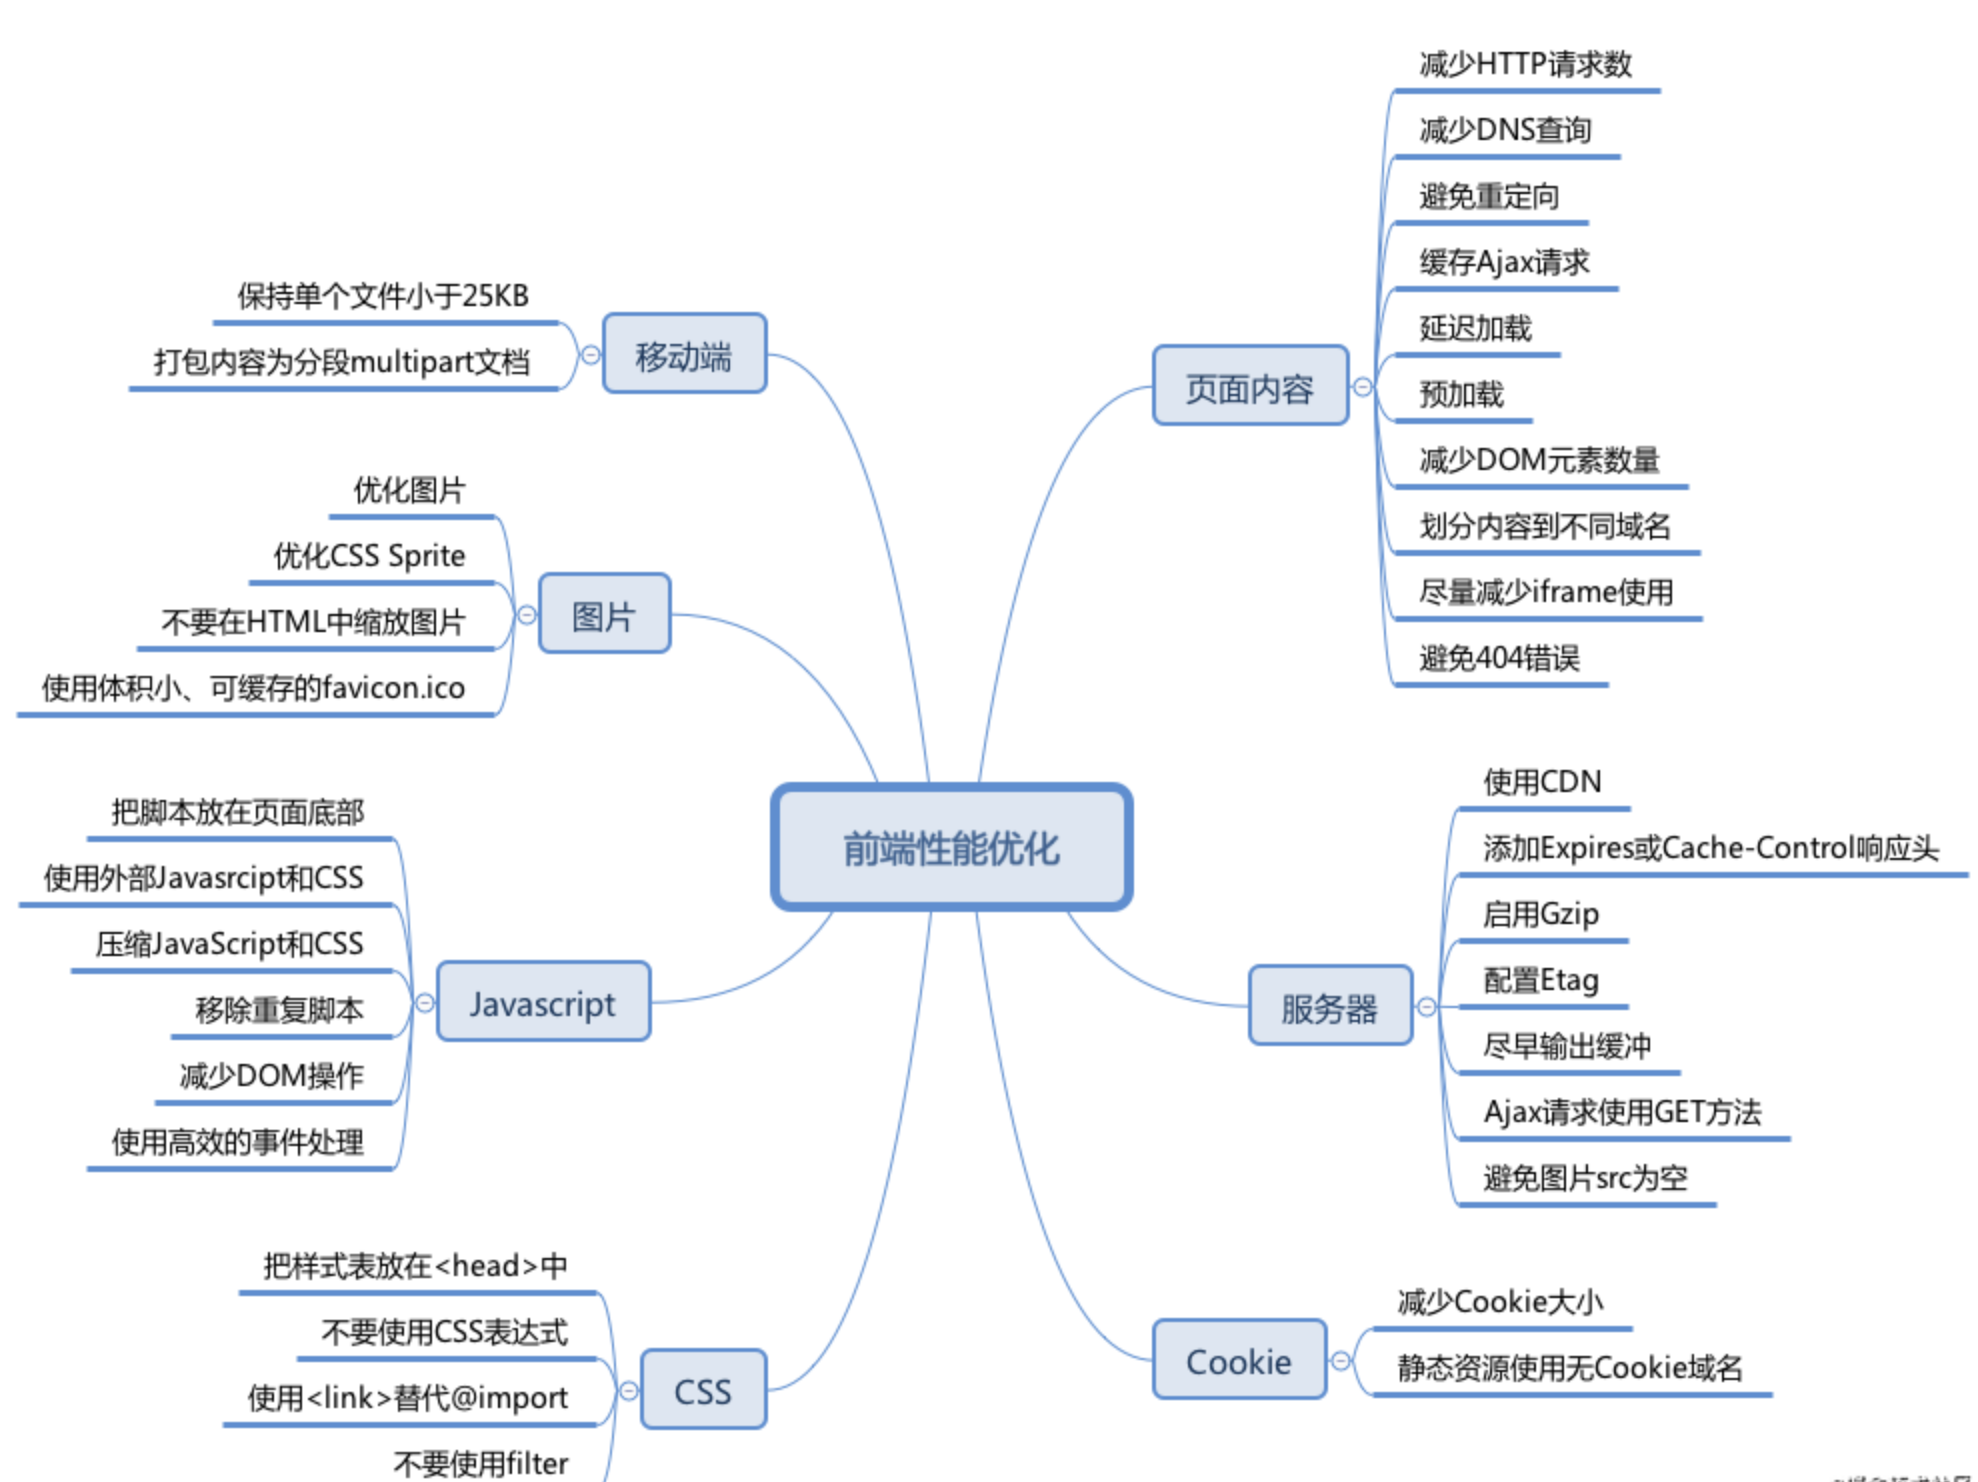
1、减少cookie传输
cookie传输会造成带宽浪费,可以:
- 减少
cookie中存储的东西 - 静态资源不需要
cookie,可以采用其他的域名,不会主动带上cookie
2、避免过多的回流与重绘
连续触发页面回流操作
let cards = document.getElementsByClassName("MuiPaper-rounded"); |
看下效果,很明显的卡顿
performance分析结果,load事件之后存在大量的回流,并且chrome都给标记了红色
使用
fastDom进行优化,将对dom的读和写分离,合并
let cards = document.getElementsByClassName("MuiPaper-rounded"); |
performance分析结果,load事件之后也没有了那么多的红色标记
感兴趣的可以去了解一下fastDom:github fastdom 在线预览:fastdom demo
关于任务拆分与组合的思想,react fiber架构做的很牛逼,有兴趣的可以去了解一下调度算法在fiber中的实践
四、压缩
1、Gzip
开启方式可参考:nginx开启gzip
还有一种方式:打包的时候生成gz文件,上传到服务器端,这样就不需要nginx来压缩了,可以降低服务器压力。 可参考:gzip压缩文件&webPack配置Compression-webpack-plugin
2、服务端压缩
server.js
const express = require('express'); |
package.json
"start": "npm run build && node server.js", |
3、JavaScript、Css、Html压缩
工程化项目中直接使用对应的插件即可,webpack的主要有下面三个:
UglifyJSwebpack-parallel-uglify-pluginterser-webpack-plugin
具体优缺点可参考:webpack常用的三种JS压缩插件。
压缩原理简单的讲就是去除一些空格、换行、注释,借助es6模块化的功能,做了一些tree-shaking的优化。同时做了一些代码混淆,一方面是为了更小的体积,另一方面也是为了源码的安全性。
css压缩主要是mini-css-extract-plugin,当然前面的js压缩插件也会给你做好css压缩。使用姿势
npm install --save-dev mini-css-extract-plugin |
html压缩可以用HtmlWebpackPlugin,单页项目就一个index.html,性能提升微乎其微~
4、http2首部压缩
http2的特点
- 二进制分帧
- 首部压缩
- 流量控制
- 多路复用
- 请求优先级
- 服务器推送
http2_push: 'xxx.jpg'
具体升级方式也很简单,修改一下nginx配置,方法请自行Google
五、webpack优化
上文中也提到了部分webpack插件,下面我再来看看还有哪些~
1、DllPlugin 提升构建速度
通过
DllPlugin插件,将一些比较大的,基本很少升级的包拆分出来,生成xx.dll.js文件,通过manifest.json引用
webpack.dll.config.js
const path = require("path"); |
package.json
"scripts": { |
webpack4不需要配置dll了,因为webpack4打包性能已经足够优化,vue-cli3都已经移除
dll
2、splitChunks 拆包
optimization: { |
六、骨架屏
用css提前占好位置,当资源加载完成即可填充,减少页面的回流与重绘,同时还能给用户最直接的反馈。 图中使用插件:react-placeholder
关于实现骨架屏还有很多种方案,用Puppeteer服务端渲染的挺多的
使用css伪类:只要css就能实现的骨架屏方案
七、窗口化
原理:只加载当前窗口能显示的DOM元素,当视图变化时,删除隐藏的,添加要显示的DOM就可以保证页面上存在的dom元素数量永远不多,页面就不会卡顿
图中使用的插件:react-window
安装:npm i react-window
引入:import { FixedSizeList as List } from 'react-window';
使用:
const Row = ({ index, style }) => ( |
八、缓存
1、http缓存
keep-alive
判断是否开启:看response headers中有没有Connection: keep-alive 。开启以后,看network的瀑布流中就没有 Initial connection耗时了
nginx设置keep-alive(默认开启)
# 0 为关闭 |
Cache-Control / Expires / Max-Age
设置资源是否缓存,以及缓存时间
Etag / If-None-Match
资源唯一标识作对比,如果有变化,从服务器拉取资源。如果没变化则取缓存资源,状态码304,也就是协商缓存
Last-Modified / If-Modified-Since
通过对比时间的差异来觉得要不要从服务器获取资源
更多HTTP缓存参数可参考:使用 HTTP 缓存:Etag, Last-Modified 与 Cache-Control
2、Service Worker
借助webpack插件
WorkboxWebpackPlugin和ManifestPlugin,加载serviceWorker.js,通过serviceWorker.register()注册
new WorkboxWebpackPlugin.GenerateSW({ |
九、预加载 && 懒加载
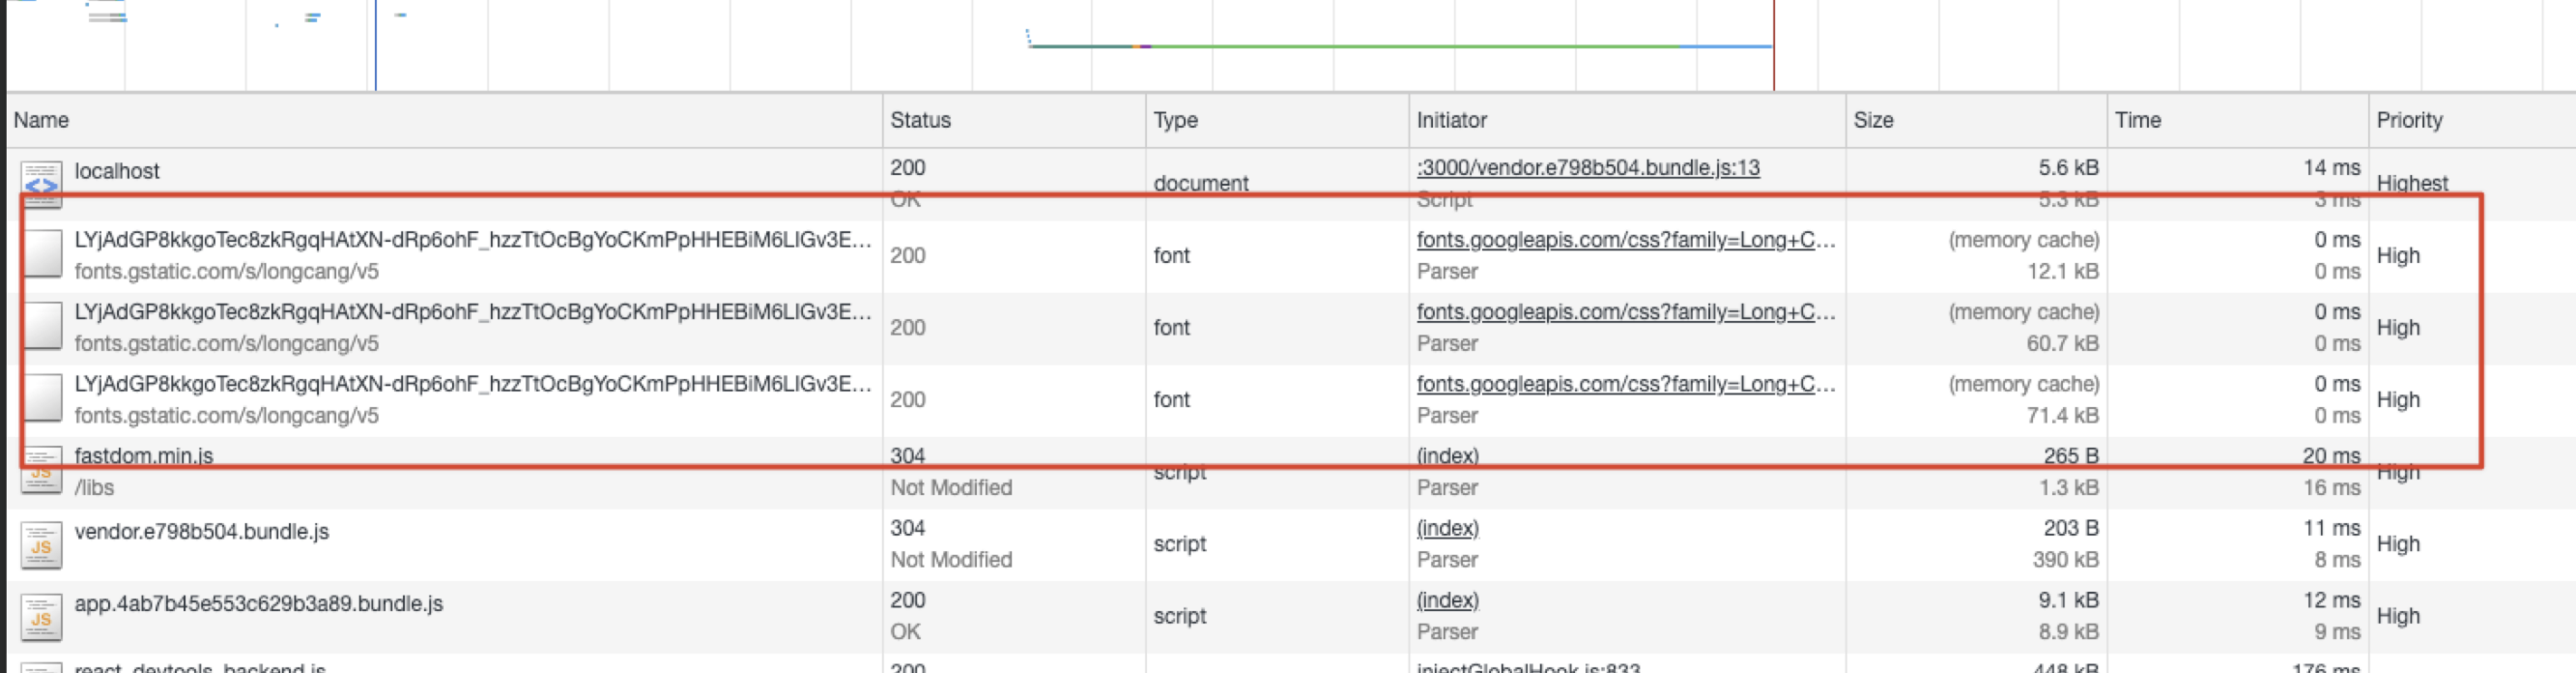
1、preload
就拿demo中的字体举例,正常情况下的加载顺序是这样的:
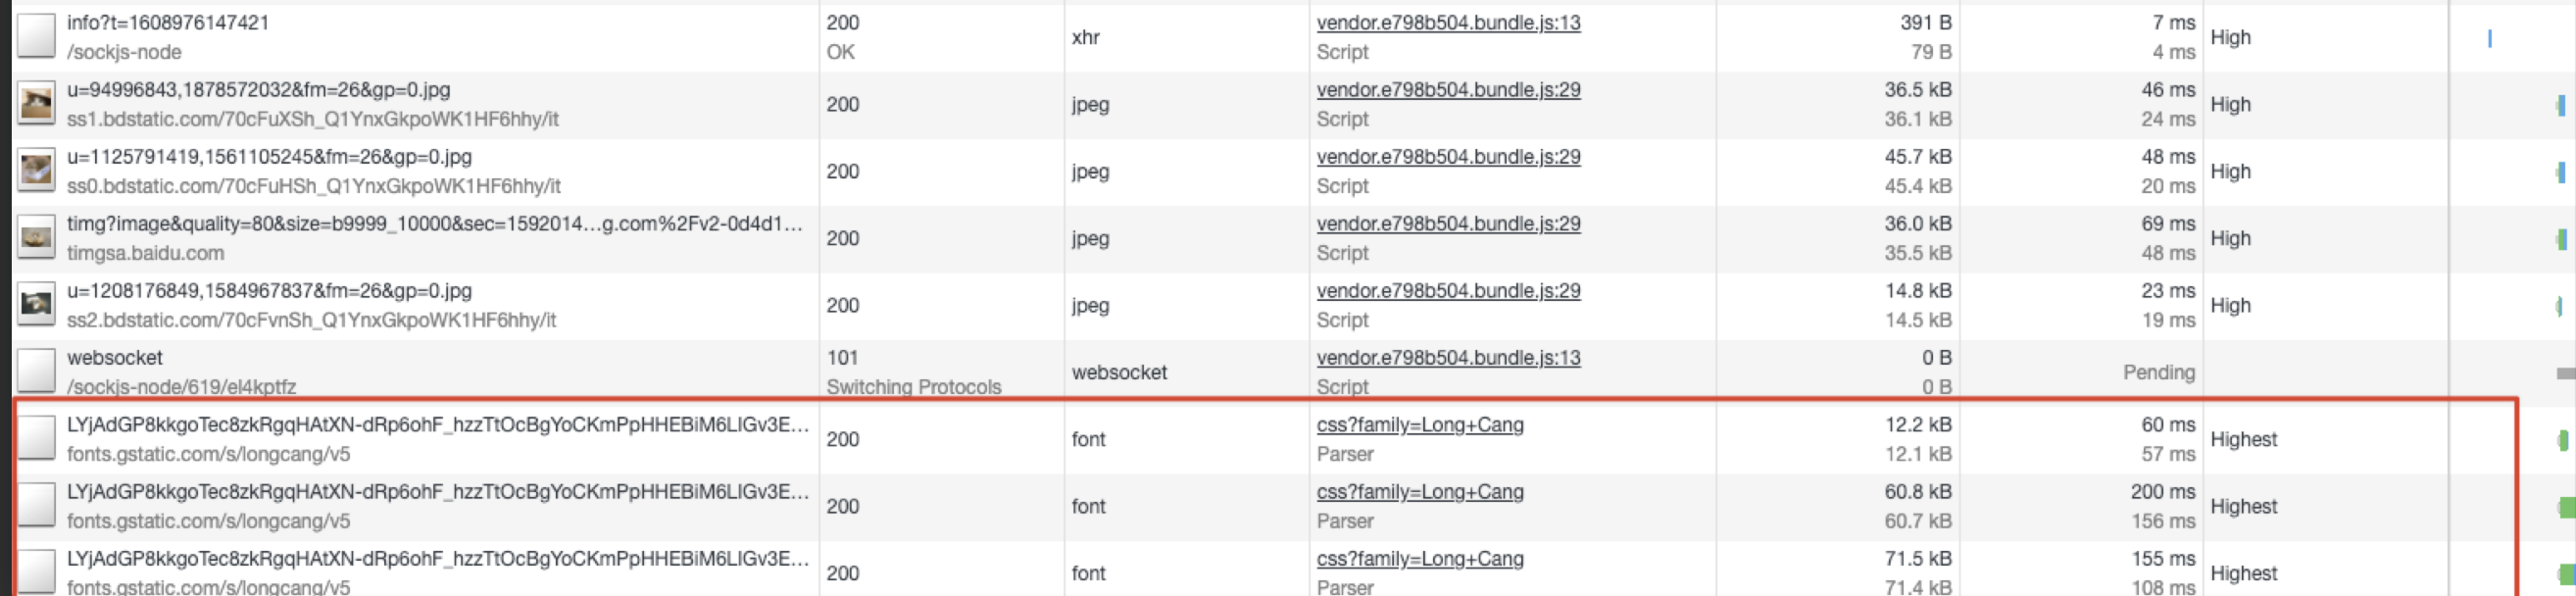
加入preload:
<link rel="preload" href="https://fonts.gstatic.com/s/longcang/v5/LYjAdGP8kkgoTec8zkRgqHAtXN-dRp6ohF_hzzTtOcBgYoCKmPpHHEBiM6LIGv3EnKLjtw.119.woff2" as="font" crossorigin="anonymous"/> |
2、prefetch
场景:首页不需要这样的字体文件,下个页面需要:首页会以最低优先级
Lowest来提前加载
加入prefetch:
需要的页面,从prefetch cache中取
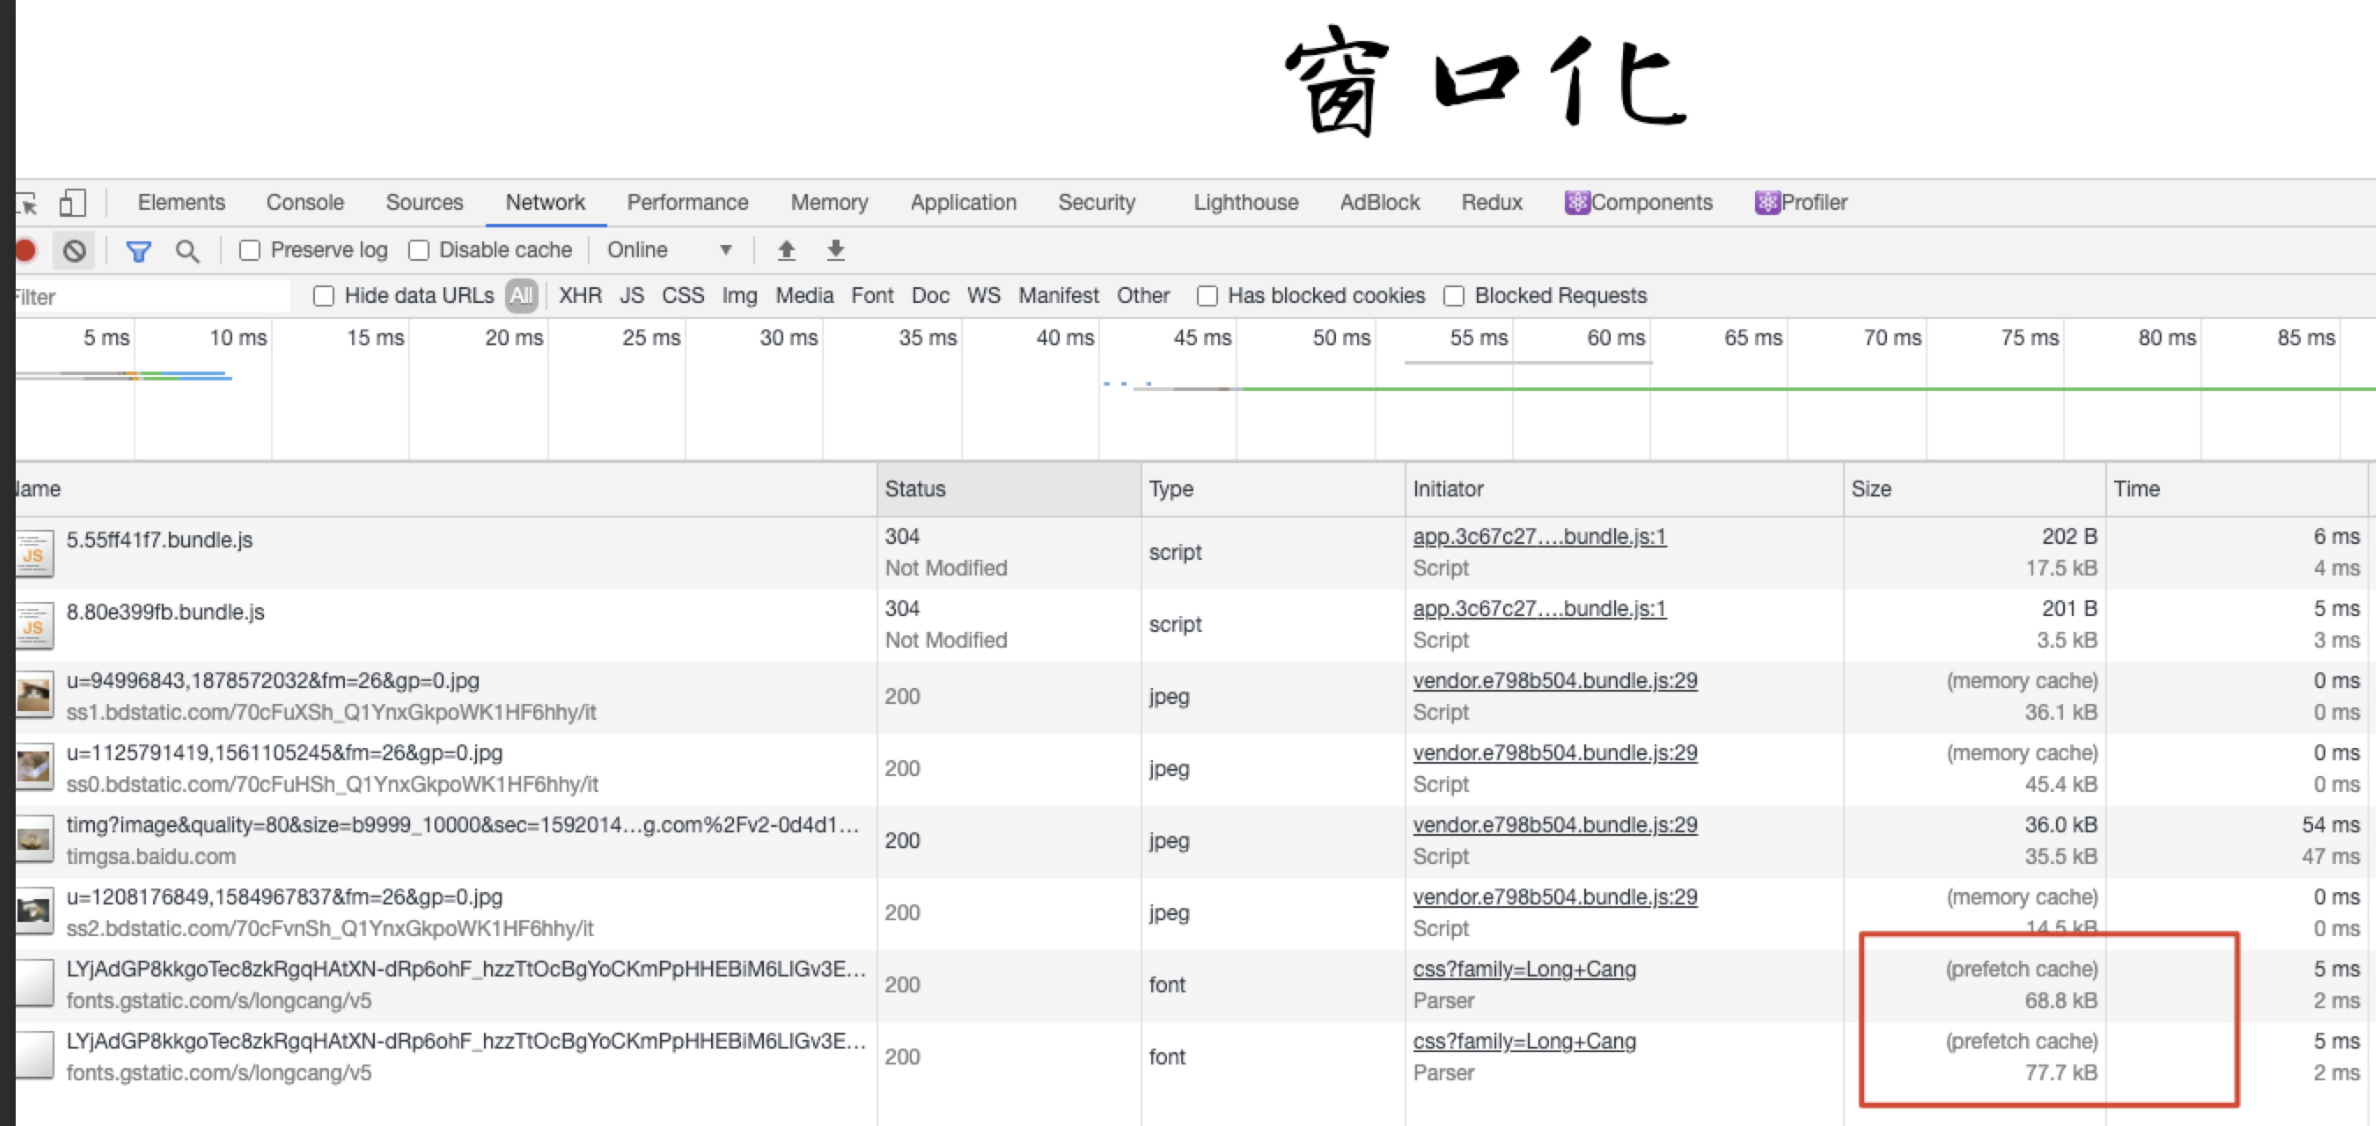
webpack也是支持这两个属性的:webpackPrefetch 和 webpackPreload
3、懒加载
图片
机械图片

渐进式图片(类似高斯模糊) 需要UI小姐姐出稿的时候指定这种格式

响应式图片
原生模式:<img src="./img/index.jpg" sizes="100vw" srcset="./img/dog.jpg 800w, ./img/index.jpg 1200w"/>
路由懒加载
通过函数 + import实现
const Page404 = () => import(/* webpackChunkName: "error" */'@views/errorPage/404'); |
十、ssr && react-snap
- 服务端渲染
SSR,vue使用nuxt.js,react使用next.js react-snap可以借助Puppeteer实现先渲染单页,然后保留DOM,发送到客户端
十一、体验优化
白屏loading
loading.html 需要自取哦,还有种方式,使用webpack插件HtmlWebpackPlugin将loading资源插入到页面中
|